Our cousin E has an amazing "blondie" recipe that she was so kind and shared with me, and I plan sharing with you on this blog soon! But until then I used part of that delicious recipe and experimented with some cupcakes today.
These are fluffy and light as air, filled with fresh apricots, as they are in full season, and frosted with a velvety meringue. The apricots bake inside the cupcake and transform in this creamy delicious filling. I believe it is a perfect combination between the sweetness of the cake, tartness of the apricots and creaminess of the meringue.
Ingredients (for 12 cupcakes):
3 eggs, separated
1/2 cup granulated sugar
3 tablespoons vegetable oil (sunflower or canola)
1 1/4 cup all purpose flour
1/2 teaspoon baking powder
1 small pinch of salt
1 tablespoon pure vanilla extract ( you can use one teaspoon, I love vanilla and tend to exaggerate )
6 ripe fresh apricots, pitted, cut in half.
Preheat oven to 350 degrees F (180 C)
Line your cupcake pan with your favorite cupcake liners.
Method:
1. Separate the eggs, putting the egg whites in the clean (wipe the bowl with a paper towel and lemon juice or vinegar to remove any fat traces) bowl of your electric mixer (don't use plastic bowls, use glass, stainless steel, copper or ceramic ones) and the egg yolks in another bowl.
2. Start beating the egg whites, on low for 30 seconds, then on medium-high for about 3-4 minutes, or until soft peaks form.
3. Gradually add the sugar, and beat another 2 minutes or so, until it gets stiff and glossy.
4. Whisk the egg yolks with the vegetable oil well, then add to this the vanilla extract and mix.
5. Add the egg yolk mixture over the beaten egg whites, and using a spatula or wooden spoon fold in, slowly.
6. Sift over the eggs the flour, salt and baking powder. Fold in carefully, just until combined.
The batter should be fluffy but not runny, should keep it's shape, like in the photo bellow.
7. With the help of an ice cream scoop or spoon, fill the cupcake liners with the batter, up to half of the height.
8. Place over the batter half of apricot
9. Cover the apricot with another spoon of batter. In the end the cupcakes should be filled up to two thirds.
10. Bake cupcakes on the middle rack of the oven for 17-20 minutes, depending on your oven, until puffed up and golden on top.
11. Carefully take the pan out of the oven, and let the cupcakes cool on a cooling rack.
Make the meringue frosting:
Ingredients:
1 cup egg whites (egg whites from 4-5 eggs)
1 cup granulated sugar
1 teaspoon pure vanilla extract (I use Tahitian vanilla extract for this)
1 teaspoon lemon juice or almond extract (you can also skip this all together)
Gel food coloring of your choice (I used Americolor soft gel food coloring in color Peach, 3 tiny drops)
Method:
1. Put a medium sauce pan with some water on heat to get to a simmer.
2. In the clean bowl of your mixer add the egg whites and sugar, and place the bowl over the simmering pot, taking care that it does not touch the water and fits snugly.
3. With a clean hand whisk beat slowly but constantly, until the sugar is completely dissolved, and the mixture is hot to the touch. It should take 5-7 minutes. To be more precise use a candy thermometer, and take them off the heat when they reach 140 degrees F.
4. Place the bowl on the mixer,after wiping the bottom dry and using the whisk attachment beat them on medium speed until soft peaks form, and the bowl cools down. You can also do this by hand, it does not take too long.
5. Add the lemon juice (or almond extract if you wish), vanilla extract and food coloring. Careful to add the food coloring drop by drop, not too much at once, to make sure you get the desired hue. If you want a deeper color you can always add more later. The food coloring is pretty strong, and very little is needed. Beat everything on medium high for couple more minutes, until glossy and stiff peaks form. It is important not to over beat it, as it will start to look grainy, and will be hard to pipe and of course not look as good.
6. Fill a piping bag fitted with a tip of your choice, with the meringue, making sure there are no air bubble left. This is kind of tricky, but it is worth taking care of if you want the frosting to look as perfect as possible. I used a big simple round piping tip to achieve this classic look.
This meringue frosting is best used immediately, so be sure to start making it right before you will use it. Also it is best eaten the same day, as it does not keep well. (maybe one night in the fridge won't ruin it though, but it won't be as good). The best part of this frosting is that it is pure white, and it makes so much easier coloring it in pale pastel hues, and the colors stay true. It is also very easy to handle and frost/pipe it on your desserts.
To make my cupcakes fabulous I decorated them with edible golden stars.
So, what do you think?
Fourth of July baking took over my kitchen, and so I also made this cute little cupcakes. What is special about them is a hidden white star you find inside them when cut. It is so unexpected, pretty and festive! Perfect to take to a 4th of July barbecue.
To make the cupcakes I used the same white cake recipe as for the Fourth of July Cake. Make one recipe of the cake, and bake it in a sheet pan lined with parchment paper, at 325 degrees F, for 20 minutes. Let it cool to room temperature, then pop it in the freezer for at least 30 minutes.
Freezing the cake sheet will make it much easier to cut and then stand in the cupcake pan.
Prepare your cupcake pan, using your favorite cupcake liners.
Preheat oven at 325 degrees F.
Prepare another recipe of the white cake, tinting it at the end with blue gel food coloring, or any other color you wan to use, just make sure the stars and the other batter have different colors.

With a 2-2.5 inch star shaped cookie cutter, cut out stars out of the chilled cake sheet.
Place a star, standing on two of it's five little feet, in the center of each cupcake liner, and make you sure you put all of them on the same line, so that you will remember where the stars are facing. This is important. I like to put them paralel to the pan's edge.
Using a spoon, carefully spoon blue/colored batter in front, and back of the star, so that it is helps it stand. If you just pour the batter on top you risk the star to fall, and it won't stand strait. Keep adding batter in the cupcake liner, up to 2/3 of it's height, as you would normally do for regular cupcakes. Carefully place the pan in the preheated oven, and bake for 20 minutes. Check them with a toothpick to make sure they are done.
Let them cool on a wire rack in the pan.
Take a small sharp knife and make small superficial cuts on top of the cupcakes, all the way across, till the paper, on the same line as the stars inside, so after you take the cupcakes out of the pan, you will be able to see exactly what way the stars are oriented. The cut won't be obvious unless you look carefully.
Prepare your favorite cupcake frosting recipe. I used Swiss meringue buttercream on some , and cream cheese frosting on others. (left overs from the cake :) )
Frost the cupcakes to your liking, but remember not to cover the cut near the paper liner, so you can still see the sign you made, and so you can cut them when serving, to make the stars show up!
You can use this technique for making many fun cupcakes. You could make pink hearts inside of Valentine's Day cupcakes for example!
Pan di Spagna (literally 'bread of Spain'), is a cake invented in the mid 1700's by Giobatta Cabona (a cook from Genoa at the service of the genoese ambassador in Spain, marquis Domenico Pallavicini) on the occasion of a banquet, where he presented a cake of incredible lightness, that took its name to honor the Spanish court. It is very similar to the American chiffon cake.
The high oil and egg content creates a very moist cake, and as oil is liquid even at cooler temperatures, it does not tend to harden or dry out as traditional butter cake might. This makes them better-suited to filling or frosting with ingredients that need to be refrigerated or frozen, such as pastry cream or ice cream. It also tends to be lower in saturated fat than butter cakes, making them healthier than their butter-heavy counterparts.
I love this cake for so many reasons: very few and unpretentious ingredients, easy and fast to make, and so many uses! I think of it as one of the basic recipes in baking, that you can use as a starting point for classic layered cakes, for cupcakes, pound cakes, cake rolls, trifle and many more. Back at home it is usually baked in a loaf pan, then served as slices with confectioner's sugar sprinkled on top.
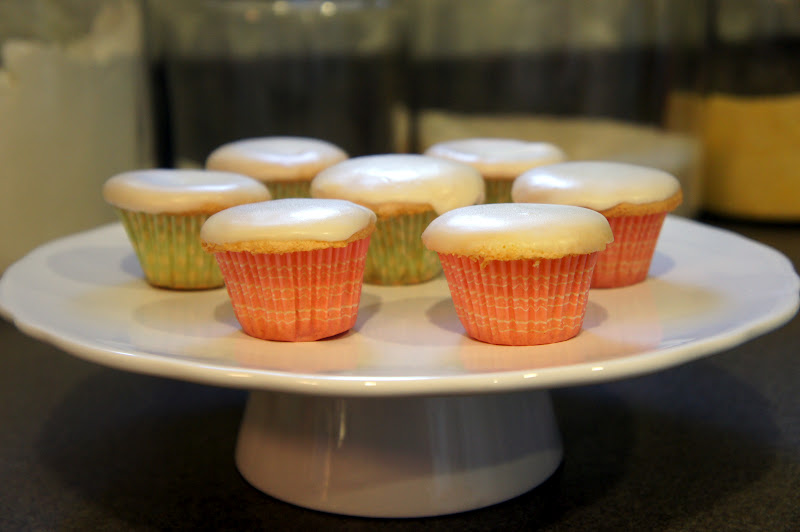
 I used this recipe the other day to make cupcakes, some frosted with chocolate ganache, and some with lemon icing.
This is what you need for about 24 cupcakes (2 loafs if you use loaf pans instead, or 3, 8 inch cake layers if you want to make a cake):
For the cake:
7 eggs, separated
1 1/2 cups granulated sugar
7 spoons water
7 spoons vegetable oil (canola, corn or sunflower oil)
1 tablespoon pure vanilla extract
1 1/2 cups all purpose or cake four, sifted
1 pinch of salt
1 teaspoon baking powder (the original recipe does not ask for backing powder, you can skip it, but I usually add some)
For chocolate ganache:
2 cups good quality chopped dark semi-sweet chocolate
3/4 cup heavy whipping cream
For lemon icing:
2 cups confectioner's (powder) sugar
2 tablespoons butter, melted
3 tablespoons lemon juice (I use Meyer lemons, because I love their taste and fragrance)
Method:
Preheat oven at 360 degrees F (180 C).
Prepare the pans you will bake the cake in, greasing them with butter and lining with parchment paper, or lining the muffin tins with cupcake liners.
In the clean bowl of a stand mixer fitted with the whisk attachment (of course you can use a hand mixer, or if you are in shape even a regular whisk), beat the egg whites on medium-high speed until soft peaks form, for 2 minutes or so, then gradually add the sugar, and beat until very stiff, for 2-3 more minutes. Stop the mixer. Leave the bowl with the meringue in place.
In another bowl whisk together the egg yolk, vanilla extract, water, vegetable oil, then sift on top the flour, salt and baking powder together, and mix everything well.
Change the whisk attachment of the stand mixer with the paddle attachment. Start the mixer on low ( I put my KitchenAid on 2 or 3) and gradually add the egg yolk mixture, beating for 20 seconds, just until combined, not more. Make sure to scrape the sides of the bowl with a spatula.
The best would be to carefully fold them in using a spatula, but it worked very well with the mixer too. It is important though to mix very lightly in order for the beaten egg whites to keep their volume, so the cake is light and fluffy as we want it to be. The dough should be very airy, soft, and light, like a beaten mousse.
To make cupcakes, carefully fill them to two thirds, with batter. The easiest way to do this is using a large ice cream scoop, of about 2.5 inches diameter. One full scoop takes the exact quantity of batter needed for a perfect cupcake.
Bake them for 17-20 minutes, until they puff up and are golden on top. Keep an eye on them, but do not open the oven before 15 minutes pass. Try to see if they are done by carefully pressing on top, (don't burn yourself though by touching the oven, be careful!) with your finger, and if it springs back, they are done. You can also use the toothpick method, inserting a toothpick in, and if it comes out clean, it means they are done. Every oven is different, so it is better to try them and see when they are done, for best results. It can take only 15 minutes in some, or even 20 in other ovens.
I also made mini cupcakes, and you have to bake them only 12-15 minutes.
Whenever I want to bake two different sizes of cupcakes, what I do is to fill out the big ones, place them in the oven, then start filling the small ones after that, and place them in the oven later, as it usually takes me 5 minutes to fill all the mini liners, so they are both ready in the same time.
When done, let them cool in the tins, then carefully remove them. While they cool you can prepare the frosting/ icing.
To make the chocolate ganache: heat the heavy cream in a sauce pan over medium heat, until small bubbles form on the pan sides, turn heat off, drop the chocolate on top, let it stand and melt for 5 minutes, then mix well until smooth and shinny. You can use this chocolate ganache in many desserts, as cakes like this or this, for profiteroles or frost various other things, like a cheesecake.
To make the lemon icing: juice one medium Mayer lemon (to get 3 tablespoons lemon juice). Set the juice aside, in a medium bowl. Melt the butter in a small sauce pan or butter warmer. Pour it over the lemon juice and mix, then add the confectioner's (powder) sugar, and mix well. Let stand for 5-10 minutes before using it. Mix once more just before frosting with it. You can control the thickness of the icing by adding more lemon juice or sugar, until you get the desired consistency. It will harden a little as it sets after you frost the cupcakes.
For easy frosting, just carefully take the cupcake keeping it by the liner, turn it upside down and dip in frosting gently, covering all the top, with circular motions, then slowly turn them upright, and place on a rack to set. Do the same with the chocolate ganache.
Because this cake is so moist, baking it in cupcake liners, and frosting them, ensures a longer freshness, as they don't dry out fast, so you can keep and enjoy them for a few days!