Showing posts with label homemade. Show all posts

Tuesday

Sekerpare

If you are craving home made Turkish (or Middle Eastern) desserts, and you don't feel like spending hours in the kitchen, this, my friends, is the recipe for you. It is as easy as can be. Sekerpare (sheckerparé) means "sugar bit". And they are sweet as sugar indeed. It is very similar to a cookie, but it is soaked in delicious syrup, like most of the Turkish sweets. Keep in mind though that you need to make this one day, or at least 10-12 hours before you want to serve them. 

Ingredients for 30-36 Sekerpare (one tray)


1 stick softened butter (100-110 g)

1 cup confectioner's sugar
4 egg yolks
4 cups flour, sifted
1 tablespoon baking powder
1 tablespoon pure vanilla extract . I started using vanilla bean paste, it is still quite liquid,but the nice part is that you get the vanilla seeds as well, and I love that. It is also much cheaper than using whole vanilla beans. 
1 small pinch of salt
30-36 whole , raw, blanched nuts of your choice ( hazelnuts, macadamia, pine nuts, almonds, pistachio)

For the syrup

3 cups sugar
3 cups water
1 tablespoon fresh lemon juice
1 tablespoon pure vanilla extract

Method:


Start by making the syrup. In a medium sauce pan mix the sugar, water and lemon juice, bring to a boil, then let it simmer for 10-15 minutes. Turn the heat off, and add the vanilla extract, mix and set aside. 


Preheat oven to 350 degrees.


In a bowl beat the sugar and butter for 2-3 minutes, then add 3 of the egg yolks and vanilla extract and mix. You will need one egg yolk to brush the top of the cookies. 

Add the baking powder, salt and flour, mixing just until you get an oily soft dough, but hard enough not to stick to your hands, and to be able to make small balls out of it. Careful not to over work the dough. Adjust the flour quantity if needed. Even if it looks a little crumbly don't worry, it will get smooth when shaping it.

In order to have all the cookies same size, it is best to use a small ice cream scoop (25 mm or 20 mm), the one that you use for your regular cookies. Sekerpare must be the size of a walnut. Scoop some of the dough and using your hands and make balls out of it, placing them on a sheet pan, covered with parchment paper.


When done, using a pastry brush, gently brush the tops with egg yolk. 

Place a nut in the middle of each cookie, pressing gently in order to flatten it a bit. Even if it cracks a little it is fine, if not even better, as it will be easier for it to absorb the syrup. 
Bake the cookies for about 40 minutes.
Quickly move the cookies in a deeper, and smaller dish, so they fit snugly. 
The secret to great Sekerpare is that you pour the lukewarm syrup on top of the hot, straight out of the oven cookies, then cover the dish. The syrup must not be cold, nor hot. The cookies must be hot.
Let the Sekerpare soak up the syrup overnight, on the counter. They will be ready to serve the second day. 
I prefer most of my desserts with a dollop of vanilla ice cream on top, and I recommend you try Sekerpare this way as well, it goes really well. Or with fresh whipped cream. 
Enjoy!

Ramazan Bayraminiz mubarek bolsun!

Thursday

Apricot cupcakes

Our cousin E has an amazing "blondie" recipe that she was so kind and shared with me, and I plan sharing with you on this blog soon! But until then I used part of that delicious recipe and experimented with some cupcakes today. 

These are fluffy and light as air, filled with fresh apricots, as they are in full season, and frosted with a velvety meringue. The apricots bake inside the cupcake and transform in this creamy delicious filling. I believe it is a perfect combination between the sweetness of the cake, tartness of the apricots and creaminess of the meringue. 
                          
                             
Ingredients (for 12 cupcakes):


3 eggs, separated
1/2 cup granulated sugar
3 tablespoons vegetable oil (sunflower or canola)
1 1/4 cup all purpose flour
1/2 teaspoon baking powder
1 small pinch of salt
1 tablespoon pure vanilla extract ( you can use one teaspoon, I love vanilla and tend to exaggerate )
6 ripe fresh apricots, pitted, cut in half. 


Preheat oven to 350 degrees F (180 C)
Line your cupcake pan with your favorite cupcake liners.


Method:


1. Separate the eggs, putting the egg whites in the clean (wipe the bowl with a paper towel and lemon juice or vinegar to remove any fat traces) bowl of your electric mixer (don't use plastic bowls, use glass, stainless steel, copper or ceramic ones) and the egg yolks in another bowl.
2. Start beating the egg whites, on low for 30 seconds, then on medium-high for about 3-4 minutes, or until soft peaks form.
3. Gradually add the sugar, and beat another 2 minutes or so, until it gets stiff and glossy.
4. Whisk the egg yolks with the vegetable oil well, then add to this the vanilla extract and mix.
5. Add the egg yolk mixture over the beaten egg whites, and using a spatula or wooden spoon fold in, slowly.
6. Sift over the eggs the flour, salt and baking powder. Fold in carefully, just until combined.
The batter should be fluffy but not runny, should keep it's shape, like in the photo bellow.


7. With the help of an ice cream scoop or spoon, fill the cupcake liners with the batter, up to half of the height.
8. Place over the batter half of apricot


9. Cover the apricot with another spoon of batter. In the end the cupcakes should be filled up to two thirds.
10. Bake cupcakes on the middle rack of the oven for 17-20 minutes, depending on your oven, until puffed up and golden on top.
11. Carefully take the pan out of the oven, and let the cupcakes cool on a cooling rack.


Make the meringue frosting:


Ingredients:
1 cup egg whites (egg whites from 4-5 eggs)
1 cup granulated sugar
1 teaspoon pure vanilla extract (I use Tahitian vanilla extract for this)
1 teaspoon lemon juice or almond extract (you can also skip this all together)
Gel food coloring of your choice (I used Americolor soft gel food coloring in color Peach, 3 tiny drops)


Method:


1. Put a medium sauce pan with some water on heat to get to a simmer.
2. In the clean bowl of your mixer add the egg whites and sugar, and place the bowl over the simmering pot, taking care that it does not touch the water and fits snugly. 
3. With a clean hand whisk beat slowly but constantly, until the sugar is completely dissolved, and the mixture is hot to the touch. It should take 5-7 minutes. To be more precise use a candy thermometer, and take them off the heat when they reach 140 degrees F.
4. Place the bowl on the mixer,after wiping the bottom dry and using the whisk attachment beat them on medium speed until soft peaks form, and the bowl cools down. You can also do this by hand, it does not take too long.
5. Add the lemon juice (or almond extract if you wish), vanilla extract and food coloring. Careful to add the food coloring drop by drop, not too much at once, to make sure you get the desired hue. If you want a deeper color you can always add more later. The food coloring is pretty strong, and very little is needed. Beat everything on medium high for couple more minutes, until glossy and stiff peaks form. It is important not to over beat it, as it will start to look grainy, and will be hard to pipe and of course not look as good. 
6. Fill a piping bag fitted with a tip of your choice, with the meringue, making sure there are no air bubble left. This is kind of tricky, but it is worth taking care of if you want the frosting to look as perfect as possible. I used a big simple round piping tip to achieve this classic look. 
This meringue frosting is best used immediately, so be sure to start making it right before you will use it. Also it is best eaten the same day, as it does not keep well. (maybe one night in the fridge won't ruin it though, but it won't be as good). The best part of this frosting is that it is pure white, and it makes so much easier coloring it in pale pastel hues, and the colors stay true. It is also very easy to handle and frost/pipe it on your desserts. 


To make my cupcakes fabulous I decorated them with edible golden stars. 
So, what do you think?


Wednesday

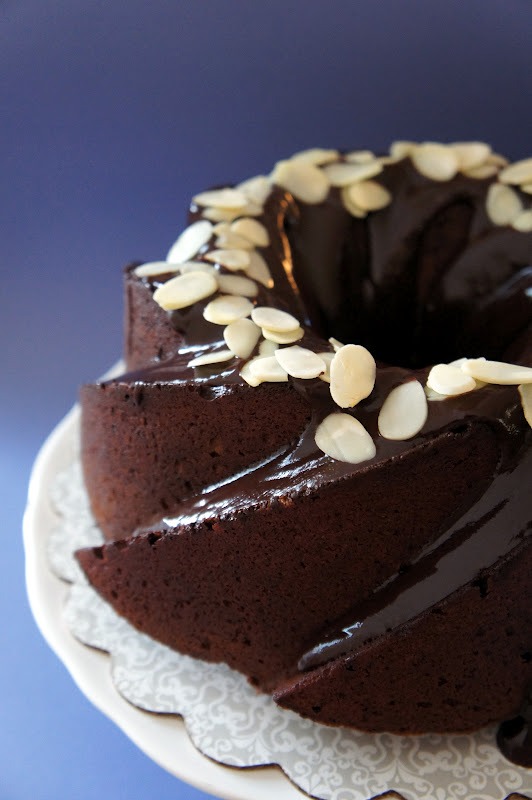
Chocolate on chocolate mascarpone bundt cake


Because a day without chocolate is a day lost, I give you with no further introduction the chocolate on chocolate mascarpone bundt cake


Chocolate bundt cake 

Ingredients
2+1/2 cups all-purpose flour
1/4 cup cocoa
1 tsp baking powder
3/4 tsp salt
1/2 cup mascarpone
1/2 cup heavy cream
7 ounces chocolate, chopped
8 ounces butter, plus more for pan
1 + 1/4 cups sugar
5 eggs 
1 tbs pure vanilla extract

Method
  1. Preheat your oven to 325F (170C).
  2. Butter a 14-cup Bundt cake pan and set aside. If your pan has a lot of corners and complicated shapes, melt 2 tablespoons of butter and use a pastry brush to spread the butter all over the pan, getting in all the corners, so that your cake comes out easily. 
  3. Sift flour, cocoa, baking powder and salt into a large mixing bowl. Whisk and set aside.
  4. In a small saucepan, bring cream to a boil. Place chopped chocolate in a small bowl and pour hot cream, through a sieve, over the chopped chocolate. Stir until smooth and creamy in texture.
  5. Add mascarpone and mix. Let aside to cool.
  6. Cream butter and sugar with a mixer until fluffy.
  7. Add the eggs and beat until combined.
  8. Stir in vanilla extract.
  9. On low speed, add the flour mixture in three equal amounts alternating with the chocolate batter, ending with flour.
  10. Pour the batter into the Bundt pan and bake for 55-60 minutes (or until a wooden toothpick insterted in center comes out clean). If the toothpick is wet, bake 5 more minutes and check again.
  11. Let cool in pan, invert onto a serving plate and start preparing the chocolate ganache glaze.

Chocolate glaze

Ingredients
4.5 ounces bittersweet chocolate, chopped
1/2 cup heavy cream
2 tbsp butter
1/4 cup almond slivers

Method

  1. In a small saucepan, bring cream to a boil.
  2. Add chopped chocolate and butter and let stand without mixing for 3-4 minutes.
  3. Stir until smooth and creamy in texture.
  4. Let stand, stirring occasionally until slightly thickened.
  5. Pour over the cooled cake
  6. Sprinkle some almond slivers on top for some crunch


Monday

The perfect vanilla cake

For me at least :)
I love vanilla, and this cake is so soft and fluffy, it makes my tummy tickle. Pair it with an amazing cream cheese frosting, and it can't get any better! Oh wait! It does get better! It is pink, and lavender... a wonderful delicate yumminess. Perfection.


I wanted to bake a  gradient colored cake for a long time, and I am so happy I finally did. Can't wait to try a rainbow one too!
The original recipe for this cake was with butter cream frosting, but I don't really like butter cream. Why would you use butter mixed with sugar for frosting? Yes, it looks good and is easy to use and frost with it, but I really don't like the texture or taste of it. It is just greasy. And I tried them all, simple butter cream, meringue butter cream, but none works for me. 

Cream cheese frosting has a lovely texture, is super creamy but not greasy, it has a tang to it, that I love, that really compliments the rich vanilla cake. It goes beautiful with chocolate too. You can as well color it anyway you want using food coloring.
You can also use a custard base cream for this cake. 
And I am planning to make one covered in fondant as well. So many thinks to try and do!
The white frosting works very well with a layered and colorful cake like this, because it just makes it a wonderful surprise when you cut a simple white cake and discover such a pretty inside. 

Ingredients:

For the cake
5 ounces egg whites ( 5 large egg whites or 150 grams ) I just put 2/3 cup
3/4 cup whole milk ( 180 ml )
1 tablespoon pure vanilla extract ( 15 ml )
2 1/2 cups sifted cake flour ( 10 ounces or 285 grams )
1 3/4 cups sugar ( 12 ounces or 350 grams )
1 tablespoon baking powder
pinch of salt
12 tablespoons butter ( 6 ounces or 170 grams ) cut in cubes
pink and lavender food colorings
Cake recipe adapted from Sweetapolita

Cream cheese frosting
16 oz cream cheese ( 450 grams) I use Philadelphia regular 
1 cup heavy whipping cream ( 8 ounces or 240 ml ) 
2 cups confectioners sugar ( 200 grams ) You can put 3 cups if you want it sweeter 
1 tablespoon pure vanilla extract

When you bake any cake it is very important to accurately measure the ingredients and for all the ingredients to have room temperature.

Method:

Preheat oven at 350 degrees F ( 180 C ).
Butter and line with parchment paper 2, or 4 if you have, 8 inch cake pans. I have 2, so I baked the cake in 2 rounds.
Mix in a bowl the egg whites, 1/4 cup milk and the vanilla. Set aside.
In the bowl of an electrical mixer fitted with the paddle attachment combine the dry ingredients : flour, sugar, baking powder and salt. 
Add the butter and remaining milk ( 1/2 cup ) and mix on low speed until combined, then on medium ( 4 ) for 1-2 minutes.
Add the egg white mixture, in 3 separate batches, beating for 20 seconds after every batch, scraping the sides of the bowl. Your batter should look smooth like this. If it curdles means you had too much liquid in the batter. I don't know if it will work adding just  a little more flour, like 1-2 tablespoons, because it never happened to me, but you can give it a try if you have a curdled batter.

Divide the batter equally in 4 separate bowls. You can do that using a kitchen scale. I don't have one yet, so I just divided it using a large ice cream scoop like this one, that you can use to divide batter for cupcakes too. It is important to have equal amounts of batter to make sure your layers will be equal in thickness when baked. 

Put one drop of pink food coloring in the first bowl, one pink plus one purple in the second, 2 purple drops in the third, and 3 drops of purple in the fourth. Mix well each, with different spoons/forks/spatulas.
You can do this using whatever colors and combination you want. This is a fun cake to make!

Bake the 4 different colored batches of batter. I put two pans at once in the oven, on the same rack, int he middle. Bake for 16 minutes. Baking time depends on your oven as well, so make sure to check them around minute 14, and see if  when you insert a toothpick in center comes out clean. It can be 15, 16 or 17 minutes. Is important not to over bake, and this is easy because the layers are quite thin, so keep a watchful eye on them.
After baking the first two layers, let them cool, then delicately take them out of the pans. The layers are thin and very delicate. The colder they are the easiest will be to take them out. Parchment paper helps you a lot in this step. so it is important to use it.
Put them on a wire rack to cool completely. 
Wash, dry, butter and line with parchment the pans again quickly, and bake the other two layers.
Let them cool too, and here you have 4 beautiful different colored cake layers.

Prepare the frosting:
Whip the heavy whipping cream using and electric mixer, using the wire whip attachment, until it gets stiff whipped cream. Put it aside in a bowl.
In the same bowl of the electrical mixer beat the cream cheese using the paddle attachment, on medium speed, until fluffy. Add the confectioners sugar gradually, and the vanilla, and beat on medium ( 4 on my KitchenAid ) for 7-10 minutes, until light and fluffy. Fold in the whipped cream and mix well. 


I love cream cheese frosting, but I wanted it to be a little more light and airy, so I thought of combining it with whipped cream, and this is now my favorite cake frosting! It will work great on cupcakes as well, I can't wait to try!
Place the darkest lavender colored layer ( the one with 3 drops of coloring ) on the cake stand, or serving platter you will use for the cake. Using the same ice cream scoop place two dollops of the frosting in the middle of the layer, and spread evenly using a spatula.
Place the layer with two purple coloring drops on, spread with another 2 dollops of frosting, then the one with pink and purple coloring, spread with frosting, and finally the last pink layer on top. 

Frost the whole cake with a thin layer of cream cheese frosting, to crumble coat it. This will ensure that no cake crumbs will get into your final layer of frosting, and have a perfect result. Place in fridge for 30 minutes to set. You can then finish frosting it with the remaining cream.

Hope you will enjoy making this cake as much as I did. It is like playing in kindergarten! And there are so many variations you can try, just let your imagination go wild. I am planning on making a double batch of this batter, in order to make more layers to this cake! A six or seven layer cake would be so cool! 

Thanks for reading!
A