Showing posts with label cake. Show all posts

Saturday

Ema's brownie ... or blondie?


This cake I was introduced to earlier in the summer, while visiting my hubby's cousin, Ema. I like to think of her as my cousin too now. I love her, she is an awesome person. Everybody in the family was excited for her barbecue party, but not as much for the barbecue itself but more about this scrumptious cake she makes. And you can imagine I got very excited about this, all our cousins were raving about it, and as soon as we got there we dug in, before having any actual food, even some of us breaking all strict diets and all, and ate half of the cake in a heartbeat. Then we ate an array or various grilled meats, sides and salads, all delicious, and yes, we finished everything with the other half of the cake. It was an awesome evening! 


And of course I asked her for the recipe and the permission to share it here on Askanam. She is a total sweetheart, and agreed. 
Back home we call this type of cake a brownie, although it has nothing much in common with the American brownie. My Mom also makes this type of cake, but Ema had changed and improved the recipe over the years, as she has been making this since her school years, and the results are great to say the least. Well I must say I added my own touch to it, errrr, just by doubling the quantity of chocolate sauce, haha. Because well, you can never have to much chocolate, right?

Ingredients for a 9x13 inch pan, around 40 servings (yes, portion size is very small, as the cake is very rich, but of course, you eat as many as you want or can... that means a lot more than 1 for us): 

For the cake:
7 large eggs, separated
1 cup granulated sugar
7 tablespoons vegetable oil (sunflower, canola or corn)
1 1/2 cups all purpose flour
1 teaspoon baking powder (optional, works just as fine without)
1 small pinch of salt
1 tablespoon pure vanilla bean paste or extract

For the frosting:
6 egg whites
1 1/2 cups granulated sugar
1 teaspoon vinegar (optional)
2 tablespoon corn starch  (optional)

For the sauce:
6 egg yolks
1 1/2 cups granulated sugar
2 stick of butter, softened preferably 
1 cup of milk
2/3 cup good quality cocoa powder 
1 tablespoon pure vanilla extract

Method:

First, make the cake.
Prepare a 9x13 inch baking pan lined with parchment paper, and preheat oven to 350 degrees F (180 C).
Separate the egg whites from yolks, putting the whites in the clean bowl of your mixer, fitted with the whip attachment, and the yolks in the bowl of a small food processor, blender or just a medium bowl.
Start beating the egg whites on lowest speed for 20-30 seconds. Increase the speed to high, and beat for 1-2 minutes until soft peaks. Add a pinch of salt. With the mixer still on high speed add the sugar gradually, and beat until stiff glossy peaks form, another 2 minutes or so. This times are for a KitchenAid stand mixer, it might take a little longer time if you use a hand held mixer, that is not as powerful. 
Blend/process or beat with a fork or whisk the egg yolks and vegetable oil very well, until thick and lighter in color. Mix in the vanilla.
Add the egg yolk mixture over the egg whites (meringue) and mix/fold in gently with a wooden spoon.
Sift on top of it the flour and baking powder, and fold in gently just until incorporated. Do not over mix. 


Pour the batter in the pan, level with an offset spatula, and bake for 23 minutes, on the middle rack. Check after 20 minutes, by gently pressing with the finger on top. If the cake springs back it is done, so you can take it out of the oven. Don't over bake the cake, as it will dry out, and you will place it again in the oven later. It is better to be under baked actually. But not as much as it to deflate when you take it out. Keep a close watch on it, and take it out as soon as it sets. 
After the cake is done,take it out on a heat proof surface, and let the oven on, increasing the temperature to 380 degrees F. 


While the cake bakes, make the topping.
Wash and dry the mixer bowl and whip. Repeat the same process with the egg whites as you did for the cake. When the meringue is stiff and glossy sift over the corn starch, add the vinegar and gently mix.
Pour the meringue over the cake, level it well with an offset spatula, return pan to oven and bake at 380 F for 15 minutes, until the top is golden and crisp. You can put the meringue on the hot, just out of the oven cake. 


Let the cake cool down completely on a rack, in the pan. When cool using a sharp knife cut it in small, 1 inch squares. 

Make the chocolate sauce.
In a sauce pan mix well together the cocoa powder and sugar, so there are no cocoa lumps. Add the milk and butter, mix, and place on medium heat, mixing constantly. Get to a boil, and let it cook for 1 minute.
In a medium bowl beat the egg yolks with 2-3 tablespoons of sugar. When the cocoa has boiled, take it off heat. Add one tablespoon of the hot mixture and add it to the yolks, mixing very well. Do this for several times, increasing to 2,3, 4 tablespoons of hot mixture you add every time, mixing well after each addition. This is in order to temper the eggs, so you don't get scrambled eggs.  When the bowl is almost fool, return it's contents to the rest of cocoa mixture in the sauce pan, and mix well everything. The sauce should be glossy, thicker and delicious. Add the vanilla and  mix. 


With a spoon, pour hot chocolate sauce on each cold cake square. Or just pour it over, but slowly. The cake should be "swimming" in chocolate sauce. It is best to make the cake few hours in advance, so it has time to soak up the sauce. It keeps well for 2-3 days, in a cool dry place. I keep it in the oven after it cools. 

Now stop thinking about calories, and eat!

Thank you, Ema! 

Thursday

Apricot cupcakes

Our cousin E has an amazing "blondie" recipe that she was so kind and shared with me, and I plan sharing with you on this blog soon! But until then I used part of that delicious recipe and experimented with some cupcakes today. 

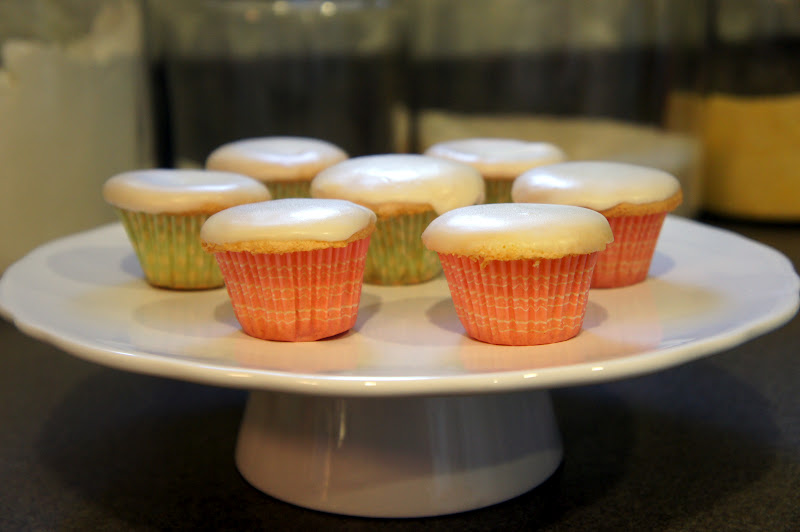
These are fluffy and light as air, filled with fresh apricots, as they are in full season, and frosted with a velvety meringue. The apricots bake inside the cupcake and transform in this creamy delicious filling. I believe it is a perfect combination between the sweetness of the cake, tartness of the apricots and creaminess of the meringue. 
                          
                             
Ingredients (for 12 cupcakes):


3 eggs, separated
1/2 cup granulated sugar
3 tablespoons vegetable oil (sunflower or canola)
1 1/4 cup all purpose flour
1/2 teaspoon baking powder
1 small pinch of salt
1 tablespoon pure vanilla extract ( you can use one teaspoon, I love vanilla and tend to exaggerate )
6 ripe fresh apricots, pitted, cut in half. 


Preheat oven to 350 degrees F (180 C)
Line your cupcake pan with your favorite cupcake liners.


Method:


1. Separate the eggs, putting the egg whites in the clean (wipe the bowl with a paper towel and lemon juice or vinegar to remove any fat traces) bowl of your electric mixer (don't use plastic bowls, use glass, stainless steel, copper or ceramic ones) and the egg yolks in another bowl.
2. Start beating the egg whites, on low for 30 seconds, then on medium-high for about 3-4 minutes, or until soft peaks form.
3. Gradually add the sugar, and beat another 2 minutes or so, until it gets stiff and glossy.
4. Whisk the egg yolks with the vegetable oil well, then add to this the vanilla extract and mix.
5. Add the egg yolk mixture over the beaten egg whites, and using a spatula or wooden spoon fold in, slowly.
6. Sift over the eggs the flour, salt and baking powder. Fold in carefully, just until combined.
The batter should be fluffy but not runny, should keep it's shape, like in the photo bellow.


7. With the help of an ice cream scoop or spoon, fill the cupcake liners with the batter, up to half of the height.
8. Place over the batter half of apricot


9. Cover the apricot with another spoon of batter. In the end the cupcakes should be filled up to two thirds.
10. Bake cupcakes on the middle rack of the oven for 17-20 minutes, depending on your oven, until puffed up and golden on top.
11. Carefully take the pan out of the oven, and let the cupcakes cool on a cooling rack.


Make the meringue frosting:


Ingredients:
1 cup egg whites (egg whites from 4-5 eggs)
1 cup granulated sugar
1 teaspoon pure vanilla extract (I use Tahitian vanilla extract for this)
1 teaspoon lemon juice or almond extract (you can also skip this all together)
Gel food coloring of your choice (I used Americolor soft gel food coloring in color Peach, 3 tiny drops)


Method:


1. Put a medium sauce pan with some water on heat to get to a simmer.
2. In the clean bowl of your mixer add the egg whites and sugar, and place the bowl over the simmering pot, taking care that it does not touch the water and fits snugly. 
3. With a clean hand whisk beat slowly but constantly, until the sugar is completely dissolved, and the mixture is hot to the touch. It should take 5-7 minutes. To be more precise use a candy thermometer, and take them off the heat when they reach 140 degrees F.
4. Place the bowl on the mixer,after wiping the bottom dry and using the whisk attachment beat them on medium speed until soft peaks form, and the bowl cools down. You can also do this by hand, it does not take too long.
5. Add the lemon juice (or almond extract if you wish), vanilla extract and food coloring. Careful to add the food coloring drop by drop, not too much at once, to make sure you get the desired hue. If you want a deeper color you can always add more later. The food coloring is pretty strong, and very little is needed. Beat everything on medium high for couple more minutes, until glossy and stiff peaks form. It is important not to over beat it, as it will start to look grainy, and will be hard to pipe and of course not look as good. 
6. Fill a piping bag fitted with a tip of your choice, with the meringue, making sure there are no air bubble left. This is kind of tricky, but it is worth taking care of if you want the frosting to look as perfect as possible. I used a big simple round piping tip to achieve this classic look. 
This meringue frosting is best used immediately, so be sure to start making it right before you will use it. Also it is best eaten the same day, as it does not keep well. (maybe one night in the fridge won't ruin it though, but it won't be as good). The best part of this frosting is that it is pure white, and it makes so much easier coloring it in pale pastel hues, and the colors stay true. It is also very easy to handle and frost/pipe it on your desserts. 


To make my cupcakes fabulous I decorated them with edible golden stars. 
So, what do you think?


Wednesday

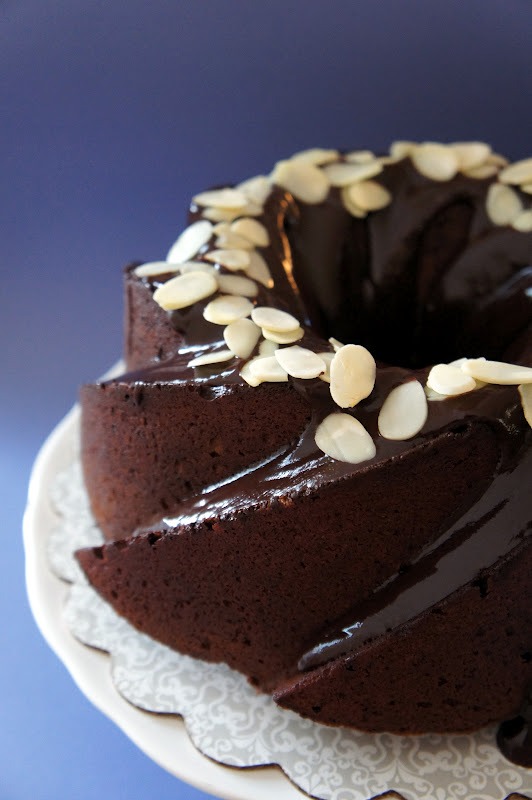
Chocolate on chocolate mascarpone bundt cake


Because a day without chocolate is a day lost, I give you with no further introduction the chocolate on chocolate mascarpone bundt cake


Chocolate bundt cake 

Ingredients
2+1/2 cups all-purpose flour
1/4 cup cocoa
1 tsp baking powder
3/4 tsp salt
1/2 cup mascarpone
1/2 cup heavy cream
7 ounces chocolate, chopped
8 ounces butter, plus more for pan
1 + 1/4 cups sugar
5 eggs 
1 tbs pure vanilla extract

Method
  1. Preheat your oven to 325F (170C).
  2. Butter a 14-cup Bundt cake pan and set aside. If your pan has a lot of corners and complicated shapes, melt 2 tablespoons of butter and use a pastry brush to spread the butter all over the pan, getting in all the corners, so that your cake comes out easily. 
  3. Sift flour, cocoa, baking powder and salt into a large mixing bowl. Whisk and set aside.
  4. In a small saucepan, bring cream to a boil. Place chopped chocolate in a small bowl and pour hot cream, through a sieve, over the chopped chocolate. Stir until smooth and creamy in texture.
  5. Add mascarpone and mix. Let aside to cool.
  6. Cream butter and sugar with a mixer until fluffy.
  7. Add the eggs and beat until combined.
  8. Stir in vanilla extract.
  9. On low speed, add the flour mixture in three equal amounts alternating with the chocolate batter, ending with flour.
  10. Pour the batter into the Bundt pan and bake for 55-60 minutes (or until a wooden toothpick insterted in center comes out clean). If the toothpick is wet, bake 5 more minutes and check again.
  11. Let cool in pan, invert onto a serving plate and start preparing the chocolate ganache glaze.

Chocolate glaze

Ingredients
4.5 ounces bittersweet chocolate, chopped
1/2 cup heavy cream
2 tbsp butter
1/4 cup almond slivers

Method

  1. In a small saucepan, bring cream to a boil.
  2. Add chopped chocolate and butter and let stand without mixing for 3-4 minutes.
  3. Stir until smooth and creamy in texture.
  4. Let stand, stirring occasionally until slightly thickened.
  5. Pour over the cooled cake
  6. Sprinkle some almond slivers on top for some crunch


Sunday

"Fourth of July" cake

I was really excited to try making my first Fourth of July "Independence Day" cake, and here is what it turned out like!
It was so much fun making it! But it took two days... 
First day I made the marshmallows, as they had to have time to set overnight, and baked the cake layers too, letting them chill overnight in the fridge, so that it would be easier to cut and handle when assembling the cake. Today I made the filling and frosting, and put everything together. 


I used Alton Brown's marshmallow recipe. They are very easy to make, and it is so much fun to be able to make your own colors and shapes! I made one batch, spread it on a 9 by 13 inch pan, and next day I cut them with a cookie cutter. So easy! 


 I baked 3 batches of regular white sponge cake, this means 6 7 inch pans, leaving one (2 pans)  all white, while tinting with food coloring the other two in a vivid red. To make white sponge cake I just replace the egg quantity in my regular vanilla cake recipe, with a same quantity of egg whites only. For the batter recipe, you can check my "Perfect vanilla cake" recipe.


I then cut out the domed upper part of each baked cake, so that it would be perfect straight. Then cut it in two equal layers, using a cake leveler, having now 8 layers of red cake, and 4 of white cake. This tool is very handy when making layered cakes like this. I used only five of the red cake, for symmetry. Also It was dangerous to make the cake taller, it is 8 inches tall as it is, and only 7 inches in diameter! 
For filling I used the cream cheese frosting recipe that you can also find in the "Perfect vanilla cake" post. 
 Placing pieces of parchment paper under the cake helps keep clean the cake stand while frosting it! After finishing frosting gently pull them out and you have a clean stand! This is very helpful especially when using bright colored frosting, like the blue one I used.


I started assembling the cake with a red layer, alternating with a white one, and so on, and finishing with a red layer as well. In between the layers I used a dollop of cream cheese frosting only. Using a large ice cream scoop for picking up the cream ensures you have equal amounts of it between layers. I decided on this filling because it is a little thicker, and would hold better under the weight of the cake. This is a huge cake, about 8 inches tall, so you have to take in consideration it's stability. Having the cake layers chilled also helps a lot. You can also freeze them before, but chilling was enough.
After finishing layering, I covered everything with a Swiss meringue buttercream, because it is a very white cream, so tinting it a bright blue is easier, and gives you a nice color. 

 Place a dollop of frosting on top, and using an offset spatula crumble coat the cake first. This means putting a thin layer of frosting all over it, so the crumbles won't get in your finishing layer of frosting. After crumble coating it, let it chill in the fridge for 20-30 minutes, then continue with the rest of the frosting.


The recipe for the meringue buttercream:
1 cup egg whites
2 cups granulated sugar
3 sticks softened but cold butter, cut in cubes
1 tablespoon pure Tahitian vanilla extract
small pinch of salt
5 drops of Royal Blue Ateco gel food coloring


Method:


Wipe the clean bowl and whisk attachment of your stand or regular mixer and a hand whisk with a paper towel with vinegar or lemon juice, to make sure you remove all traces of grease.
Put a sauce pan with 2-3 cups of water  on heat, and let get to a simmer. Mix the egg whites with sugar in the mixer bowl, and place it over the sauce pan, making sure the bowl does not touch the simmering water bellow. Mix continuously with a whisk, until the egg and sugar mixture gets to 140 degrees F. You can use a candy thermometer. I did not have one, but for this cake went and got one at Sur la Table, for $12. This little gadget is not expensive but it helps you so much in the kitchen, from making candy and marshmallow, to playing with chocolate or getting a perfect steak or turkey!
If you don't have one just heat everything for 6-8 minutes, until all the sugar is melted, and the egg whites are quite warm, but you must be able to touch it, so not very warm. 
Place the bowl on the mixer, and let it whip for 5-6 minutes on medium heat, until you get a glossy meringue, and the bowl reaches a neutral temperature to the touch.
Change the whisk with the paddle attachment, and with the mixer on slow, add the butter cubes one by one, until incorporated, and the cream is spreadable. If it is too runny, the butter might have been to warm. Put the bowl in the fridge to cool fo 10-15 minutes, then beat again. If the mixture curdles, keep beating and it will come together. At the end add the vanilla, salt and food coloring. Mix.
Use the frosting  immediately. If not you can keep it in the fridge or even freeze it.


After frosting the cake with the blue buttercream, I made a cake topper using my marshmallow stars. I wanted white stars to put on the blue cake, and marshmallows seemed the perfect choice for USA's Independence Day, because they are sooo... American! An explosion of stars on a beautiful blue is what I wanted. I am happy how it turned out!


The red and white striped "stick" holding the largest star is actually a paper beverage straw! ;)


So here you have it, a 9 layers cream cheese frosting filled, red,white and blue, taller than wide cake, covered in blue meringue buttercream and topped with an explosion of homemade marshmallow stars!


Happy 4th of July, everyone!

Monday

Pan di Spagna cupcakes

Pan di Spagna (literally 'bread of Spain'), is a cake invented in the mid 1700's by Giobatta Cabona (a cook from Genoa at the service of the genoese ambassador in Spain, marquis Domenico Pallavicini) on the occasion of a banquet, where he presented a cake of incredible lightness, that took its name to honor the Spanish court. It is very similar to the American chiffon cake. 
The high oil and egg content creates a very moist cake, and as oil is liquid even at cooler temperatures, it does not tend to harden or dry out as traditional butter cake might. This makes them better-suited to filling or frosting with ingredients that need to be refrigerated or frozen, such as pastry cream or ice cream. It also tends to be lower in saturated fat than butter cakes, making them healthier than their butter-heavy counterparts.
I love this cake for so many reasons: very few and unpretentious ingredients, easy and fast to make, and so many uses! I think of it as one of the basic recipes in baking, that you can use as a starting point for classic layered cakes, for cupcakes, pound cakes, cake rolls, trifle and many more. Back at home it is usually baked in a loaf pan, then served as slices with confectioner's sugar sprinkled on top. 

I used this recipe the other day to make cupcakes, some frosted with chocolate ganache, and some with lemon icing. 


This is what you need for about 24 cupcakes (2 loafs if you use loaf pans instead, or 3, 8 inch cake layers if you want to make a cake):


For the cake:
7 eggs, separated
1 1/2 cups granulated sugar
7 spoons water
7 spoons vegetable oil (canola, corn or sunflower oil)
1 tablespoon pure vanilla extract
1 1/2 cups all purpose or cake four, sifted
1 pinch of salt
1 teaspoon baking powder (the original recipe does not ask for backing powder, you can skip it, but I usually add some)


For chocolate ganache:
2 cups good quality chopped dark semi-sweet chocolate 
3/4 cup heavy whipping cream


For lemon icing:
2 cups confectioner's (powder) sugar
2 tablespoons butter, melted
3 tablespoons lemon juice (I use Meyer lemons, because I love their taste and fragrance)


Method:


Preheat oven at 360 degrees F (180 C).
Prepare the pans you will bake the cake in, greasing them with butter and lining with parchment paper, or lining the muffin tins with cupcake liners.


In the clean bowl of a stand mixer fitted with the whisk attachment (of course you can use a hand mixer, or if you are in shape even a regular whisk), beat the egg whites on medium-high speed  until soft peaks form, for 2 minutes or so, then gradually add the sugar, and beat until very stiff, for 2-3 more minutes. Stop the mixer. Leave the bowl with the meringue in place.


In another bowl whisk together the egg yolk, vanilla extract, water, vegetable oil, then sift on top the flour, salt and baking powder together, and mix everything well. 


Change the whisk attachment of the stand mixer with the paddle attachment. Start the mixer on low ( I put my KitchenAid on 2 or 3) and gradually add the egg yolk mixture, beating for 20 seconds, just until combined, not more. Make sure to scrape the sides of the bowl with a spatula. 
The best would be to carefully fold them in using a spatula, but it worked very well with the mixer too. It is important though to mix very lightly in order for the beaten egg whites to keep their volume, so the cake is light and fluffy as we want it to be. The dough should be very airy, soft, and light, like a beaten mousse. 


To make cupcakes, carefully fill them to two thirds, with batter. The easiest way to do this is using a large ice cream scoop, of about 2.5 inches diameter. One full scoop takes the exact quantity of batter needed for a perfect cupcake. 


Bake them for 17-20 minutes, until they puff up and are golden on top. Keep an eye on them, but do not open the oven before 15 minutes pass. Try to see if they are done by carefully pressing on top, (don't burn yourself though by touching the oven, be careful!) with your finger, and if it springs back, they are done. You can also use the toothpick method, inserting a toothpick in, and if it comes out clean, it means they are done. Every oven is different, so it is better to try them and see when they are done, for best results. It can take only 15 minutes in some, or even 20 in other ovens. 
I also made mini cupcakes, and you have to bake them only 12-15 minutes.
Whenever I want to bake two different sizes of cupcakes, what I do is to fill out the big ones, place them in the oven, then start filling the small ones after that, and place them in the oven later, as it usually takes me 5 minutes to fill all the mini liners, so they are both ready in the same time.


When done, let them cool in the tins, then carefully remove them. While they cool you can prepare the frosting/ icing.


To make the chocolate ganache: heat the heavy cream in a sauce pan over medium heat, until small bubbles form on the pan sides, turn heat off, drop the chocolate on top, let it stand and melt for 5 minutes, then mix well until smooth and shinny. You can use this chocolate ganache in many desserts, as cakes like this or this, for profiteroles  or frost various other things, like a cheesecake.


To make the lemon icing: juice one medium Mayer lemon (to get 3 tablespoons lemon juice). Set the juice aside, in a medium bowl. Melt the butter in a small sauce pan or butter warmer. Pour it over the lemon juice and mix, then add the confectioner's (powder) sugar, and mix well. Let stand for 5-10 minutes before using it. Mix once more just before frosting with it. You can control the thickness of the icing by adding more lemon juice or sugar, until you get the desired consistency. It will harden a little as it sets after you frost the cupcakes.


For easy frosting, just carefully take the cupcake keeping it by the liner, turn it upside down and dip in frosting gently, covering all the top, with circular motions, then slowly turn them upright, and place on a rack to set. Do the same with the chocolate ganache.
icing


Because this cake is so moist, baking it in cupcake liners, and frosting them, ensures a longer freshness, as they don't dry out fast, so you can keep and enjoy them  for a few days!


Wednesday

Twice as nice

Happy New Year! May 2012 bring you and your family lots of joy, amazing moments, as many accomplishments, and of course health and abundance! 


What would happen when you combine two of your favorite deserts? A miracle!
I made these mini cakes for the New Year's Eve dinner: creme caramel, or flan, and chocolate cake. 
To make this amazing treat I just made half of the "Death by chocolate" cake batter recipe and half of Creme caramel recipe.


Method:


1. Make the caramel:


Ingredients: 
1 1/2 cups sugar
4 tablespoons water


In a heavy sauce pan put 1 1/2 cups sugar with 4 tablespoons water on medium low heat, and cook it until in becomes glossy and darkens, like this:


Divide the caramel in 4 medium ramekins, covering the bottom and sides of them. Let them cool until caramel hardens and starts cracking.


Preheat oven to 350 degrees F (180 C). Put a kettle of water to boil.


2. Prepare the creme (flan)


Ingredients (all must have room temperature):
4 eggs
1/2 cup sugar
1 teaspoon pure vanilla extract
2 cups whole milk 


In the bowl of your electrical mixer fitted with the paddle attachment, mix 4 whole eggs on low for 1-2 minutes, then add 1/2 cup of  sugar and 1 teaspoon pure vanilla extract , and mix well on medium/low speed, in order not to incorporate air. Slowly add the milk. Mix on low until all air bubbles are gone.
Pour it in another bowl and set aside.


3. Prepare the cake batter 


Ingredients:
4 oz semisweet good quality chocolate (110 grams)
1/3 cup butter (70 grams)
1/2 cup sugar
2 eggs
2 tablespoons heaped cake flour
2 tablespoons unsweetened cocoa powder
1/2 teaspoon baking powder
pinch of salt
1 teaspoon pure vanilla extract
2 tablespoons sour cream


Break the chocolate in small pieces ( or you can just use chocolate chips instead and so you won't need to brake it ), and melt it with the butter in a sauce pan placed over another pan of boiling water. If you want you may add 1 tablespoon of rum, for more flavor. The sauce pan should not be touching the water in the second pan. 
In a bowl sift together flour, cocoa powder, baking powder and salt.

In the bowl of an electric mixer fitted with the paddle attachment beat the eggs with sugar on medium ( I put it on 4 on my KitchenAid for about 3-4 minutes ), then mix in flour, cocoa powder, baking powder, salt and vanilla extract. Mix just until incorporated on medium speed. Slowly fold in the melted butter and chocolate and the sour cream. 


4. Divide the cake batter equally in the 4 ramekins, over the hardened caramel, just to fill them half way.


5. Using the back of a spoon slowly pour the creme mixture over the cake batter, to fill the ramekins. This technique is used when making layered cocktails. Here is a useful tutorial on layering liquids.


6. Tightly cover each ramekin with aluminium foil. This is important.
Place ramekins in a pan filled with hot water, and bake for 40 minutes. The water should rise about 1,5-2 inches on the sides of the ramekins. Why bake in a water bath? Since water evaporates at the boiling point, the water bath will never get hotter than 212 degrees F (100 degrees C), no matter what the oven temperature. This means that the outer edge of your cake won't bake faster than the center, ensuring even baking. When making cheesecake, the water bath also ensures it to stay moist and not crack on top.


And miraculously, while baking, even though the creme (flan) is poured on top of the cake batter, it will sink to the bottom of the pan. Tadaaaaa!


Let them cool for 15 minutes, on a wire rack, then remove the aluminium foil and let cool completely,  then refrigerate for 2 hours. 
To serve them, run a knife around sides to loosen the edges, then place the serving plate on top of the ramekin. Holding tight, turn them upside down, and the cake will easily drop on the plate, with the caramel on top, dripping all over the cake. So delicious!


Keep the leftovers refrigerated.


You can make this cake in a large pan, or a nice bund cake pan, too.


Thanks for reading,
A