Monday

Pan di Spagna cupcakes

Pan di Spagna (literally 'bread of Spain'), is a cake invented in the mid 1700's by Giobatta Cabona (a cook from Genoa at the service of the genoese ambassador in Spain, marquis Domenico Pallavicini) on the occasion of a banquet, where he presented a cake of incredible lightness, that took its name to honor the Spanish court. It is very similar to the American chiffon cake. 
The high oil and egg content creates a very moist cake, and as oil is liquid even at cooler temperatures, it does not tend to harden or dry out as traditional butter cake might. This makes them better-suited to filling or frosting with ingredients that need to be refrigerated or frozen, such as pastry cream or ice cream. It also tends to be lower in saturated fat than butter cakes, making them healthier than their butter-heavy counterparts.
I love this cake for so many reasons: very few and unpretentious ingredients, easy and fast to make, and so many uses! I think of it as one of the basic recipes in baking, that you can use as a starting point for classic layered cakes, for cupcakes, pound cakes, cake rolls, trifle and many more. Back at home it is usually baked in a loaf pan, then served as slices with confectioner's sugar sprinkled on top. 

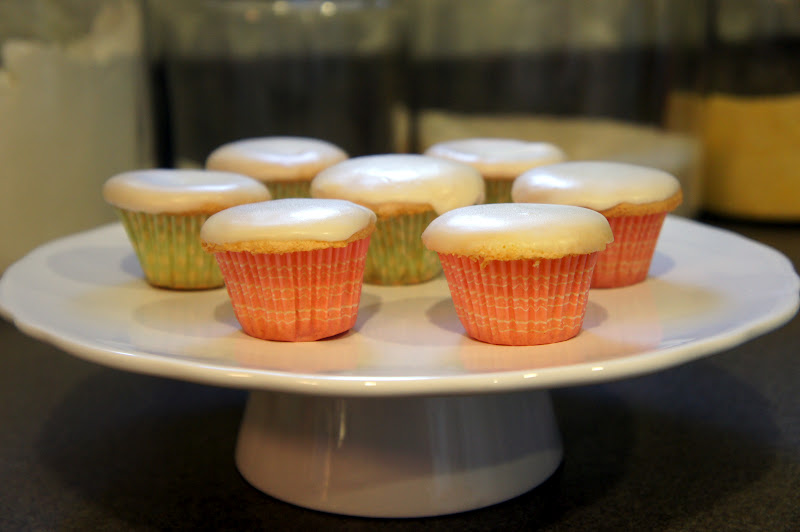
I used this recipe the other day to make cupcakes, some frosted with chocolate ganache, and some with lemon icing. 


This is what you need for about 24 cupcakes (2 loafs if you use loaf pans instead, or 3, 8 inch cake layers if you want to make a cake):


For the cake:
7 eggs, separated
1 1/2 cups granulated sugar
7 spoons water
7 spoons vegetable oil (canola, corn or sunflower oil)
1 tablespoon pure vanilla extract
1 1/2 cups all purpose or cake four, sifted
1 pinch of salt
1 teaspoon baking powder (the original recipe does not ask for backing powder, you can skip it, but I usually add some)


For chocolate ganache:
2 cups good quality chopped dark semi-sweet chocolate 
3/4 cup heavy whipping cream


For lemon icing:
2 cups confectioner's (powder) sugar
2 tablespoons butter, melted
3 tablespoons lemon juice (I use Meyer lemons, because I love their taste and fragrance)


Method:


Preheat oven at 360 degrees F (180 C).
Prepare the pans you will bake the cake in, greasing them with butter and lining with parchment paper, or lining the muffin tins with cupcake liners.


In the clean bowl of a stand mixer fitted with the whisk attachment (of course you can use a hand mixer, or if you are in shape even a regular whisk), beat the egg whites on medium-high speed  until soft peaks form, for 2 minutes or so, then gradually add the sugar, and beat until very stiff, for 2-3 more minutes. Stop the mixer. Leave the bowl with the meringue in place.


In another bowl whisk together the egg yolk, vanilla extract, water, vegetable oil, then sift on top the flour, salt and baking powder together, and mix everything well. 


Change the whisk attachment of the stand mixer with the paddle attachment. Start the mixer on low ( I put my KitchenAid on 2 or 3) and gradually add the egg yolk mixture, beating for 20 seconds, just until combined, not more. Make sure to scrape the sides of the bowl with a spatula. 
The best would be to carefully fold them in using a spatula, but it worked very well with the mixer too. It is important though to mix very lightly in order for the beaten egg whites to keep their volume, so the cake is light and fluffy as we want it to be. The dough should be very airy, soft, and light, like a beaten mousse. 


To make cupcakes, carefully fill them to two thirds, with batter. The easiest way to do this is using a large ice cream scoop, of about 2.5 inches diameter. One full scoop takes the exact quantity of batter needed for a perfect cupcake. 


Bake them for 17-20 minutes, until they puff up and are golden on top. Keep an eye on them, but do not open the oven before 15 minutes pass. Try to see if they are done by carefully pressing on top, (don't burn yourself though by touching the oven, be careful!) with your finger, and if it springs back, they are done. You can also use the toothpick method, inserting a toothpick in, and if it comes out clean, it means they are done. Every oven is different, so it is better to try them and see when they are done, for best results. It can take only 15 minutes in some, or even 20 in other ovens. 
I also made mini cupcakes, and you have to bake them only 12-15 minutes.
Whenever I want to bake two different sizes of cupcakes, what I do is to fill out the big ones, place them in the oven, then start filling the small ones after that, and place them in the oven later, as it usually takes me 5 minutes to fill all the mini liners, so they are both ready in the same time.


When done, let them cool in the tins, then carefully remove them. While they cool you can prepare the frosting/ icing.


To make the chocolate ganache: heat the heavy cream in a sauce pan over medium heat, until small bubbles form on the pan sides, turn heat off, drop the chocolate on top, let it stand and melt for 5 minutes, then mix well until smooth and shinny. You can use this chocolate ganache in many desserts, as cakes like this or this, for profiteroles  or frost various other things, like a cheesecake.


To make the lemon icing: juice one medium Mayer lemon (to get 3 tablespoons lemon juice). Set the juice aside, in a medium bowl. Melt the butter in a small sauce pan or butter warmer. Pour it over the lemon juice and mix, then add the confectioner's (powder) sugar, and mix well. Let stand for 5-10 minutes before using it. Mix once more just before frosting with it. You can control the thickness of the icing by adding more lemon juice or sugar, until you get the desired consistency. It will harden a little as it sets after you frost the cupcakes.


For easy frosting, just carefully take the cupcake keeping it by the liner, turn it upside down and dip in frosting gently, covering all the top, with circular motions, then slowly turn them upright, and place on a rack to set. Do the same with the chocolate ganache.
icing


Because this cake is so moist, baking it in cupcake liners, and frosting them, ensures a longer freshness, as they don't dry out fast, so you can keep and enjoy them  for a few days!


Thursday

Bread pudding with an upgrade

Shopping at a World Market yesterday I found some Italian cookies I used to love as a child : Savoiardi. I believe they call this type of cookie "lady fingers" here in United States. This particular ones are very dry, crisp, porous and crumbly, with a sugary sprinkle on top. They are used usually for Tiramisu, but work great for any cake. I bought them thinking to make the crust for my next cheesecake, as we are not very crazy for the graham cracker crust, and wanted to find a replacement. As a kid I used to love eating Savoiardi with my hot chocolate, dipping them in. 
savoiardi custard
Thinking about what to fix for breakfast next day, bread pudding came to mind, and this spongy cookies would be perfect to take this yummy treat up a notch. Said and done. I think bread pudding is a wonderful breakfast, but you have to have the time. If you are in a hurry this won't be a good breakfast idea. You could try it as a dinner desert though!


Here is how to make this:


Ingredients (for 2 rather large portions, or 4 smaller):
12 Savoiardi cookies (you can use any other lady finger cookies, or even left over Panettone, or why not make the classic recipe with stale bread) 
4 eggs
1/4 cup sugar (you can put less if you don't want them too sweet, as the cookies are also sweet and have sugar sprinkles on top as well)
1/3 cup heavy cream
2 cups whole milk
1/2 tablespoon pure vanilla extract, or even better, half vanilla bean seeds
1 pinch of grated nutmeg


Method:
Break the cookies in half, and arrange them in layers in the ramekins. Set aside.

savoiardi


In a bowl, or in a blender as I did, mix together sugar and eggs, then add all the rest of the ingredients and mix well, not too long though.
custard

Pour this mixture over the cookies in the ramekins, to fill them up, but not all the way to the top, as they will rise at least one inch while baking. Gently press the cookies down to make sure they are sunk in the custard. Let them soak in for at least 10-15 minutes.
savoiardi


savoiardi custard
I prepared this the night before, so I placed the ramekins in the fridge until the next morning. But you can bake them right away as well. Bake at 350 degrees F (180 C), placing them in a deep pan filled with hot water halfway up the ramekins, for 50 minutes to one hour, until they get golden brown and fluffy and the custard sets. Just keep an eye on them after 45 minutes pass, not to get them burned, as every oven is different.
baking


If your morning routine takes you about one hour, this is a great breakfast for you. What I do is, wake up, go straight to the kitchen, take the ramekins out of the fridge, place them in a deep pan, fill the pan halfway up with water, preferably hot, but cold should work too... after all, you just woke up, you need things simple and easy. Place the pan in the oven, turn the oven on to 350 degrees, and set the timer for one hour. Never place the cold out of the fridge ramekins in a preheated oven though, you risk them cracking. But if you place them in the cold oven and turn it on afterwards, it is fine. It will take them a little longer in the oven to be done if you are baking them straight out the fridge, then it would if you bake them right away.
Go get your shower, put on make up, get dressed... it takes me about one hour... long, I know... Between your mascara and blush, go check on the pudding. 
And when you are ready, your kitchen will be filled with an amazing smell, and you have a yummy hot breakfast waiting for you. 
savoiardi custard
 Careful though, as it will be very hot, let them cool a little before digging in. 


I believe this would be great with a nice sauce on top (extra calories always somehow make things tastier :), but I skipped the sauce this time), such as this one from Paula Deen:


Ingredients:
1/2 cup sugar
1/4 cup butter (1/2 stick) melted
1 egg yolk
1 teaspoon pure vanilla extract
2 tablespoons brandy, or liqueur, or 1/2 teaspoon rum essence


Mix everything but the brandy together in a sauce pan over medium heat, until the sugar dissolves, and you get a creamy consistency. Add the brandy, mix well, and pour over pudding. 


You can also top the warm pudding with ice cream, or whipped cream, and even fresh berries. 


Yum


Tuesday

Quick spin on Croque Madame

We often have dinner very very late... hubby is a workaholic... sometimes I get confused and don't know if to consider it a dinner, supper or even breakfast, as we sometimes eat at 3 or 4 AM... We had such a situation last night. Started cooking at 1 AM. Dinner. Or... Anyway, I wanted to make something fast and easy. I had planned to have grilled salmon and salad for dinner, thinking we would have a "normal" dinner, but at 1 AM I wasn't going to grill fish and get the house all smelly. So we had to improvise. And made Croque Madame, with smoked salmon. This is my first try at this dish, and wanted to make it for a long time now. It is also quite different than the classic recipe, as I had to make some substitutions, so this is my "quick" spin on it:
I usually have Croque Madame for breakfast or brunch, and my favorite is the one at Douce France, a nice French bakery in the Town and Country Village, in Palo Alto. If you are in the area you should try this place out, for brunch or breakfast, (they open at 7!)  as they have delicious treats, good coffee, and also nice service and seating outside, and I love to eat al fresco. 


This is how to make a midnight, quick and easy French inspired food:

Ingredients for one portion:

2 slices of french bread. My favorite is the LaBrea Bakery French loaf that we buy from our local Whole Foods
1 tablespoon butter
2 slices of cheese. Gruyere or other cheese you like to use for grilled cheese sandwiches. 
2 slices of smoked salmon (you can use ham instead)
If you stop here, you would have a Croque Monsieur. But I prefer to take it further to make it a Croque Madame, and add:
2 fresh eggs
1 tablespoon mayonnaise 
1/2 teaspoon Dijon mustard
Fresh ground black pepper
Pinch cayenne
Nutmeg
2-3 tablespoons wine vinegar, or lemon juice

The classic Croque Madame recipe calls for Hollandaise sauce. But hey, at 1 AM, I didn't want to make it, so I substituted it with a sauce made simply with mayo and mustard. It works great!

Method:

Place a pot with water on heat, with the vinegar or lemon juice,  to get to a simmer. You need 1 tablespoon of vinegar per cup of water. Also, if you use a nonstick pot, the water should be 1 inch deep. If is a regular pot, it needs to be about 3 inches deep. You will need this to poach the eggs in. The vinegar/lemon juice will help the eggs keep their shape, and not spread in water. 

Place a skillet on medium heat. 
Spread the butter on both sides of the bread slices. Toast bread in skillet on both sides. 
Place the slices of cheese on top of the bread, turn off the heat, cover, letting them melt. 
At this point the water in pot should be simmering. Carefully break the eggs, one at a time in a small bowl, to make sure the yolk is intact, and the egg is good. 
Gently drop the egg in the simmering water. Do the same with the second one. Stop the heat, cover, and let the eggs cook for 4-5 minutes. This will make the egg yolk barely runny. If you want them softer, keep them less. Also, if you cook more eggs at once, you have to keep them longer, 7-8 minutes for 4 eggs, for example, as they absorb more heat, therefore they need to cook longer to get the same consistency.
I recently bought this cute egg poacher on my last Williams Sonoma spree, but trying both methods, I kind of prefer to just drop the eggs directly in the pan, it works better.
Very carefully spoon out the eggs, and place on a paper towel for a few seconds to dry them.
Place the slices of smoked salmon on top of the melted cheese.
Add one poached egg on top of each slice.
I let them in the skillet up till before serving, so they stay warm.
Place them on a plate.
Spoon over some sauce.
Season with little salt, not too much as the cheese and salmon are already salty, fresh ground pepper, some cayenne and/or little grated nutmeg.


Enjoy warm, with a side of salad, or just as it is.

Thursday

Morning stories

I love breakfast. It is so great to sit down in your pajamas, your hair up in a bun, and enjoy some yummy food, with the sun shining though the open windows, and a fresh smell of spring getting in. This should be an easy to fix, but also nutritious meal, to get you started, and I believe a great day starts with an amazing breakfast. 
Today we had my favorite omelet , diced cucumbers and tomatoes drizzled with olive oil, fresh mozzarella cheese, bread with butter and jam, Turkish black tea, my favorite coffee , made with a cup of milk, 1 teaspoon of Nesquik, and 1 teaspoon of a good quality instant coffee, and mini pies . 


My favorite breakfast experience is always in Turkey, preferably in some one's home, but if you don't have friends/relatives there, there are tons of breakfast places to choose from.. They have such an awesome way to fix it, the table pretty, clean and simple, full of many elegant small bowls filled with a variety of things: cucumbers, tomatoes, drizzled with good olive oil, white cheese, olives cured in olive oil, lemon juice, crushed red pepper and thyme; home made jams, butter, hazelnut spread, cured meats, eggs, yogurt, fresh bread, freshly squeezed orange juice, and fresh fruit.
Everything is served separate, in bowls, simple and fresh, and I love just to pick a little from each and gather it on my plate. Of course the famous Turkish black tea served in small glass cups brings everything together. There is something very special about this type of breakfast, and is my absolute favorite. [I am really not into a bowl of cereals breakfast. I just have cereals at night watching TV, for some reason] 


If you ever find yourself in Turkey, please have a traditional breakfast. I am sure you will love it! This is what you do in Turkey: eat, eat, eat, anywhere, from the street corner to the upscale restaurants, everywhere will be a delicious experience, shop, shop, shop in Nisantasi, (best shopping experience is also in Istanbul; they know how to do this right), of course visit all the amazing historic sites, and get your hair done! If you ever wanted to try a new hair style and you were too afraid, or didn't trust a stylist can make your vision come true, then you have to do this while in Turkey, Istanbul more precisely. They are amazing! When living in Europe, Mom my sister and I would drive for 7 hours to Istanbul just to get our hair done. It is so worth it! Turkish women are always so stylish and love to have their make up and hair done professionally, so you will find hair salons at every corner. My favorite was Mos, in Nisantasi, but most of them will do a great job. And you will have the best blowout too. Oh, I really miss Istanbul now. It must be my favorite city in the world!

Wednesday

Mini blackberry-apple pies

This is how you make this cute little pies:

Ingredients for 12 mini pies:

Crust:
2 cups all purpose four, sifted
pinch of salt
1/3 cup confectioner's sugar (granulated would work too)
1 1/2 sticks butter, very cold, cut in cubes
3 tablespoons sour cream
3 tablespoon heavy whipping cream

Filling:
5 green apples (Granny Smith), cored, peeled, cut in small cubes
12 oz blackberries (you can substitute with any other berries)
3 tablespoons butter
1/3 cup sugar
1 teaspoon pure vanilla extract

1 tablespoon butter for the pan
1 egg, beaten

You will also need a rolling pin,  cupcake/muffin pan, parchment paper cut in 12 1 inch wide and 6 inches long pieces, cookie cutter, or a bowl, 5-6 inch wide, dough cutter, brush

Method:

In a food processor, stand mixer, or by hand, mix the flour, confectioner's sugar and salt. Add the butter and pulse/mix just until you get a crumbly consistency, with pieces of butter the size of a pea. Add the sour cream and heavy cream and mix just until combined, and it forms a ball of dough. It is important not to over work the dough. Cover it in plastic wrap and place in the fridge to rest for at least half an hour. 


Meanwhile, prepare the filling. In a saute pan on medium heat, melt the butter and sugar. Add the apples, mix, and let them cook covered on medium-low for 15 minutes, stirring once or twice. The apples will get a beautiful golden color, and the sugar will caramelize them. Sprinkle the pure vanilla extract and mix. Take them off heat, and in the blackberries. Let aside to cool, uncovered. 

Take the chilled dough, sprinkle it and the work surface with flour, not to stick, and roll it in a large thin sheet. Using a large cookie or biscuit cutter (I used a small bowl) cut discs, large enough to cover the whole cupcake pan forms. 


Preheat oven to 360 degrees F (180 C)

Grease the cupcake pan with butter, and place in each of it a 1x6 inch piece of parchment paper , like in the photo. The butter will help them stick and stay in place. This will help you safely and easily remove the pies from the pan when done, pulling them up by the free ends of the parchment paper pieces. 

Carefully lift and place the dough discs in the pan, then gently press them on the bottom and sides.
Place the pan in the freezer for 10 minutes, for the dough to chill.
Meanwhile, with the dough left,form a ball and roll it again in a sheet, and using the dough cutter, cut thin strips. You will use them to cover the top of the pies. 


Take the cupcake pan out of the freezer, spoon the filling in, and cover it in a lattice pattern with pie crust strips. Brush them with the beaten egg and bake them on the middle rack for 20-25 minutes, until the crust is golden. 


Carefully remove the pies from the pan, and serve warm with vanilla ice cream. 


Tuesday

Paprikash

This is one of my childhood's favorite foods. I was so happy every time my Mom cooked this. We have a rainy cold day in Palo Alto, so I thought some delicious comfort food, that reminds me of my childhood would be appropriate on such a day, to make us feel warm inside. 
Paprikash  is a Hungarian stew, but I am not sure this is the classical recipe, I just made it the way my Mom did. She usually made this with chicken wings, or thighs. I chose to make it with turkey wings. I just love the flavor and texture of it, sticky yummy deliciousness. 

Here is what you need for 2 portions:
4 tablespoons unsalted butter
1 pound meat : turkey wings (chicken wings, thighs, breast or even beef... your choice)
1 large onion, chopped
1 clove garlic, minced
2 tablespoons tomato paste
2 peeled and chopped tomatoes (about 1/2 cup)
Salt and fresh ground black pepper, to taste
1 tablespoon sweet paprika
1 teaspoon (or to taste) hot paprika, or other hot  red pepper
2 tablespoons sour cream
Fresh parsley 
For dumplings:
2 large eggs
1/2 and 1 tablespoon flour, sifted


Method:
Wash the meat thoroughly and pat dry with paper towels. It is always best to cook meat when it is at room temperature, not directly out of the fridge. 
Heat a large and quite deep saute pan on medium high heat, melt the butter, and brown the meat for 4-5 minutes o each side, until the skin gets golden and crunchy. Careful not to tear the skin when turning them. Also, if the pan is not deep enough , this can get messy, and even dangerous, as the butter will splash all around, so be careful, use some long thongs, and kitchen mitts.

When the skin is crispy, take them out of the pan, and set aside on a plate. Place the chopped onions and garlic in the same pan, and cook for 5-7 minutes, stirring occasionally. 


Meanwhile place a pot with water with a big pinch of salt on heat and let it get to a simmer. 


Add the tomato sauce over onions, mix well, cook for 1-2 minutes, then add the chopped tomatoes too, and cook for another 2-3 minutes. Return the meat to  pan, and add all seasoning, minus the sour cream and parsley. Stir everything, and let it simmer on low heat for 10 -15 minutes. If it gets a little dry, add some hot water from the pot you put to simmer.


While the meat cooks, prepare the dumplings.


In a medium bowl beat the eggs with a pinch of salt, then add the flour and mix well, until you get a sticky soft dough. 


When the pot of water gets to a simmer, using a teaspoon, dipped in cold water first, take small dollops of dough and place them in the simmering water.
 Even if the dough is very soft, it should come out of the teaspoon fairly easy, when you dip it all in the water, and take out the teaspoon. Do this with all the dough, you should get about 20-25 dumplings. Be careful for the water to be simmering, not boiling, so that the dumplings don't disintegrate. Cook them for 10-12 minutes. Stir slowly once or twice., after 4-5 minutes pass, not before. You will see them fluff up, and double in size. 
When the 12 minutes pass, the meat must also be almost done, and all you have to do is to scoop the dumplings out of the water, and place them on top of the meat. Don't need to drain them,  you can have some of the water in the sauce. Stir and let them cook all together for another 5-7 minutes. 
Serve hot, with a tablespoon of sour cream on top. You can garnish with fresh parsley too (if you like parsley... I don't :P )