Friday

Galette

Whether is sweet or savory, a galette is a less pretentious and easy to make, kind of rustic, tart, with a thin and crispy buttery crust. This crust takes no effort to make, and you can also make more of it ahead, pack them portioned, making balls of dough big enough for one tart, covering it in plastic wrap, and freeze, so it will be ready to use whenever you need it. Just pop it out of the freezer, fill with whatever you are craving then, fruit, cheese, veggies, then bake, and savor. 
I made a strawberry and blueberry galette. 


Ingredients (for 1 galette that serves 4):
Crust:
1 cup of flour
pinch of salt
3 tablespoons sugar
6 tablespoons butter, cut in cubes, and very cold, even frozen.
3 tablespoons of very cold yogurt, sour cream or heavy cream
1 egg, for brushing the dough
Filling:
2 cups of fresh fruit (berries, apples, plums, apricots, nectarines, cherries etc. , everything works), cut in slices, mixed with 2-3 tablespoons sugar, and sprinkled with 1 teaspoon vanilla extract. 


Method:
In a food processor (any mixer or a dough cutter works also fine, is just easier with a food processor) pulse twice the flour, salt and sugar, to combine. Add the cold butter, and pulse few times, just until you have pea sized pieces of butter, and some smaller ones too. This is important, because this pieces of butter will make the dough soft but flaky while baking. Add the yogurt or heavy cream, and pulse few times. Form the dough into a disc with your hands, wrap in plastic, and chill for 20-30 minutes at least. 
Preheat oven to 350 degrees F (180 C).
Roll out the chilled dough into a disc, 3-4 mm thick, between two plastic wrap sheets. when you get the desired size/shape, discard the plastic wrap, and place the dough sheet on a backing tray, lined with parchment paper. If you have time put this tray for 10 minutes in the freezer. 


Place the fruit in on top of the dough,leaving a one inch border around the edge. Fold this edge over the fruit, pleating it slightly, then brush it with beaten egg.


You have now a beautiful galette, ready to go in the oven. Bake on the middle rack for 35-40 minutes, until the edges are puffed up and golden. 


Let it cool on a rack for a while when ready, and serve warm with a dusting of confectioner's sugar on top, a scoop of ice cream, or whipped cream. 


You can make mini versions of this galette, for individual servings. 
A great savory version is to fill them with cheese, slices of tomato or spinach, and break an egg on top, then bake, and you have a wonderful breakfast galette! 

Yayla corbasi - Yogurt soup

In our culture yogurt has a very important role, and we do incorporate it in almost all of our dishes, even if only as a wash for various doughs, combined with egg,  or as a drink, like the refreshing Cacik or Ayran ( will tel you about those in a future post ) . We love yogurt so much that we even make a soup out of it.
This yogurt soup is easy to make, you need very few ingredients, and makes a very refreshing, healthy and light dish.


Ingredients for 4 portions:


1/4 cup rice
4 cups water ( you can also use meat stock )
1 tablespoon salt
1 egg
2 tablespoons flour
2 cups plain yogurt - room temperature if possible.
2-3 tablespoons butter
1-2 tablespoons dried mint


Method:


Wash the rice and put it to boil with the water and salt, until it gets very soft, 10-15 minutes.
Meanwhile, beat well the egg with the flour in a medium bowl, add the yogurt, mix well, and then add some water, about 1/4 cup, to make it thinner, and put in a pan over low heat, letting it cook for 10-15 minutes. It is important to have the heat on low for the yogurt not to curdle.
When the rice is cooked, pour everything (water too) on top of the yogurt, mix well, and let it cook on low for another 10-15 minutes.
In a small sauce pan melt the butter, mix it with the dried mint, but careful for the butter not to be very hot and burn the mint. Pour the butter on top of the soup, and serve hot.


See, I told you this was simple!

Housewarming party

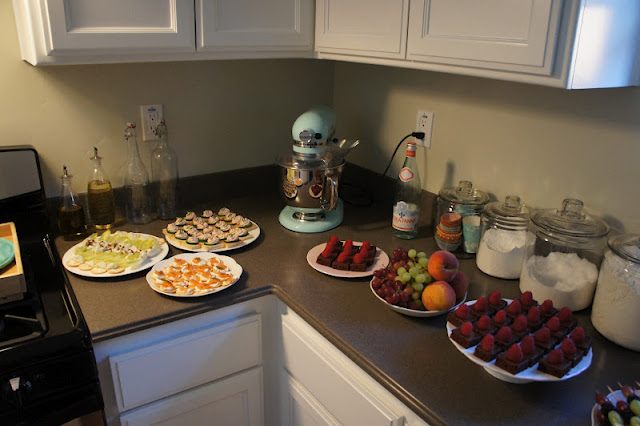
Wanted to share some photos of our housewarming party, even though it took place almost 6 months ago. I was looking for a new apartment for almost a year,  and was so happy to finally find a place we really loved, and of course we wanted to have a party after all that searching. It is so hard finding a good apartment in our area, and we wanted a brand new one, renovated, new appliances, great light, downtown... seemed impossible, but our patience paid off and we did find one that really met all of our requirements. We are so happy living here :)
It was a little scary to cook and host for so many people, as I never did this before, and we had more than 30 guests in our small apartment, and I was so worried there won't be enough food, or drinks, or space... But everything turned out so well. I had such a great time preparing and organizing it though, and the party itself was great, fun and relaxed, just as I hoped it would be. 
I did my best to make things that are easy to eat, not messy, as our apartment is mostly white, and we also had kids at the party, and to suit different tastes as well. 


This is what I prepared:


Borek, traditional tatar baked savory treats, a buttery dough filled with ground lamb meat and spices, cooked also in butter before filling the dough with it. These are great for a party as you can make them a day ahead. They get better even after a couple of days.


Zacusca, spread made of paprika peppers, served on fresh french baguette slices. Recipe for zacusca is here .

Devilled Quail eggs, served on black bread squares
Blue cheese spread served on cucumber slices


Roe salad served with cucumber slices and chives on toasted bread squares
Crostini with avocado salad and garlic shrimp
Crackers topped with cream cheese, smoked salmon and dill


One bite caprese salad, cherry tomato and bocconcini (tiny mozzarella balls) with basil, with olive oil and balsamic vinegar reduction, served on a tiny skewer, for easy grabbing 


Endive spears filled with Stilton cheese, grapes and toasted pine nuts

Rainbow fruit kabobs, that looked gorgeous and fun, and kids loved.


Death by chocolate squares, topped with chocolate ganache and fresh raspberries. I used this recipe, but only baked the sponge in a thin layer, and spread the ganache on top, cutting it then in small squares. 


Bowls with mixed nuts


For the drinks I tried to make it a little fun, and bought a variety of drinks, from vodka to brandy, liqueurs, different wines, syrups (curacao, grenadine, simple syrup), champagne, different beers, hard pink lemonade for the ladies (this is a pink, yes, pink beer, that tastes like lemonade, nothing like beer, but has alcohol). We also had a shaker, a blender and printed some cocktail recipes, so that people can mix and try different drinks.
 I found some really nice plastic glasses that looked as made of glass, and bought them in mini versions of wine, martini, and short and long tumblers. I really hate the classic plastic glasses and cutlery, but didn't have enough regular ones for so many people, and it didn't make sense buying, so this find made me very happy. None of us or our guests is a drinker, so this was perfect, having tiny glasses, just to taste and have fun. Even the shaker I bought was mini! Seems like a kids tea party, in a grown up version. I also had small bowls with lemon, lime, orange slices, fresh mint, Maraschino cherries, martini olives... well I think we had everything a full bar would have. And of course refreshments, such as fruit juices, lemonades, all the carbonated drinks, different waters.
This was a great evening spent with great people. We really really need to have another party soon! I am sorry for not having better photos of everything, but we were so agitated with the preparations and everything, that we really didn't have time to think about taking photos. I didn't even have time to change before guests arrived, but it was all right! Having nice people around you and enjoying your time is all that matters.


About housewarming parties from WikipediaThe term "housewarming" is descended literally from the act of warming a new house, in the days before central heating. Each guest would bring firewood, and build fires in all the available fireplaces, offering firewood as a gift. Aside from warming the house, this was also believed to repel evil spirits by creating a protective atmosphere of warmth. Uninhabited houses were considered targets for vagrant spirits, and therefore required a certain level of cleansing before a house was safe to be occupied. 

Tuesday

Profiteroles

Was going to make cream puffs , but somehow ended up with profiteroles... not a bad change though. Especially because I put copious amounts of chocolate ganache on top. I think I will have to eat some while writing this post... hard to resist them. 


This recipe made 12 large profiteroles. Next time I am planning to make them half size, so you can eat them in one bite. 


Preheat oven at 400 degrees F ( 200 Celsius) 


Step 1: making the shells:


Ingredients: 
1/2 cup milk or water ( I prefer milk)
4 tablespoons butter, softened 
1/3 teaspoon vanilla extract ( I put vanilla in everything, you can skip this if you want)
1 tablespoon sugar
small pinch of salt
1/2 cup flour
2 eggs, lightly beaten
1 egg, beaten, to brush the shells


In a medium sauce pan put over medium heat the milk, vanilla and butter and bring to a simmer. Careful not to keep it too long, just until  you see small bubbles on the edge. You don't want to evaporate to much water. 
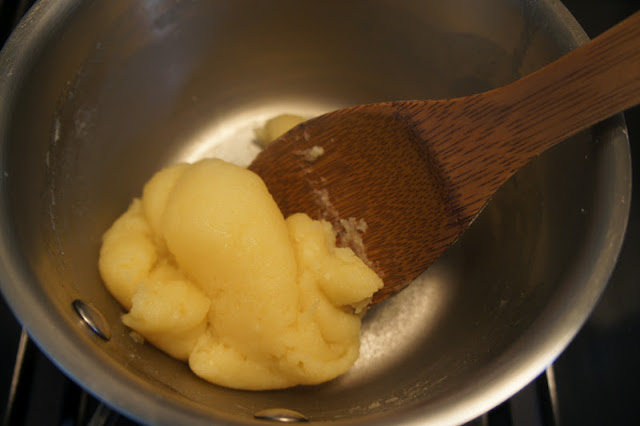
Remove from heat, add all the flour, salt and sugar at once, and mix well with a wooden spoon, until you get a ball of dough. Put back on heat, mixing continuously, for about 2-3 minutes. It will look like this:


Remove from heat and let it cool, until they are not steamy anymore. you can speed the process by keeping mixing it with the wooden spoon. 
When they are cool enough, slowly add the egg, in 3 batches, mixing very well after each. Before adding the last batch, make sure to check that the dough has the right consistency. You need it to be hard enough to keep it's shape, but soft enough to drop from the spoon if you lift it. 
If the dough is soft enough, you might not add all the egg. But in my experience the whole 2 eggs is just the right amount. You will get a soft dough looking like this:


Using 2 spoons, place dollops of dough on a cooking sheet covered with parchment paper. I just used my cupcake pan. No idea why. The dough will get 3-4 times bigger while backing, so make sure you let about 2 inches space between them. It is quite easy to shape them any way you want, but you can also use a piping bag as well. You can make them round, like profiteroles or cream puffs, or longer, like eclairs. Brush the top with beaten egg. You can shape them and smooth the surface during this step, with the help of the brush.


Bake at 400 F for 12 minutes, then reduce the temperature to 330 F ( 170 Celsius) and bake for 25 minutes more. Depending on the size of the shells you made, reduce or increase the baking time, with about 5 minutes. They are ready when they are amber colored, puffed up, and hard, with a dry center. 
When the baking time ends, prick them with a toothpick, or make a small cut with a knife, to let the steam escape, so the center does not get humid. You can let them cool in the oven, with the door slightly open. 


Step 2: make the vanilla cream, also called creme patisserie,  for filling 


Ingredients:
1 cup milk
2 egg yolks
seeds of a vanilla bean, or 1 tablespoon pure vanilla extract
2 teaspoons cornstarch
3 tablespoons sugar


Heat the milk just until it gets steamy. Add the vanilla seeds/extract. While the milk warms up, combine egg yolks, sugar and corn starch and mix until smooth. Add half of the milk on top of the egg mixture, and whisk constantly, then pour this on top of the rest of the milk in the sauce pan, continuing to whisk, over medium-low heat, for about 2 minutes, until you get a smooth thick custard. Let it cool, place plastic wrap on top, not to form a crust. Chill before filling the shells.


Step 3: fill the shells


With a small sharp knife make a small cut on the side of the shells. Put the creme patisserie in a piping bag. Insert the tip of the bag in the cut you made, and fill the shells with cream. You can also cut the shells in half and just spoon in the cream, for an easier approach. 


Step 4: make the chocolate frosting


I like to frost the profiteroles with chocolate ganache. You can use dark, milk or even white chocolate, or why not even a combination of the three. 


Ingredients:
1/2 cup heavy whipping cream
5 oz good quality chocolate, cut in small pieces, or buy it granulated.


Heat the heavy cream just until it starts bubbling on the edges of the sauce pan.  Pour the chocolate on top, letting them melt for 5 minutes. Mix it well until you get a glossy smooth chocolate ganache. 


Now you can just dip the profiteroles in the ganache, or spoon the ganache on top of them. Using a piping bag you can also make different designs if you feel creative. It will taste awesome no matter what. 


You can also serve them with ice cream: in a bowl place 2-3 profiteroles with 2 scoops of vanilla ice cream, and pour some hot ganache or other chocolate sauce on top. It is divine!


Fill them with Chantilly cream (1 cup heavy whipping cream, whipped with 2 tablespoons confectioners sugar) instead of creme patisserie and you get cream puffs. 


These shells can also be filled with cream cheese frosting, cream cheese and herbs, salmon cream... anything really. 


These are easier to make than it may seem, so go ahead! 


Monday

The perfect omelette

One of my favorite breakfasts is omelette. Simple and fast to make, cheap and versatile. Never get bored of it. 


Ingredients for one portion:
3 large eggs, organic cage free
salt and pepper
1/2 tablespoon butter, at room temperature
1/2 tablespoon butter cut in small cubes and frozen. I always have frozen cubes of butter ready for omelettes  in my freezer. But don't worry, it only takes 10 minutes to freeze, so you can just put the cut cubes in the freezer before you start making breakfast. 
cheese : I prefer grated Parmesan, Monterey Jack, or Mozzarella,  about 1/4 cup. Of course you can add as much as you like.


Break the eggs in a medium sized bowl, carefully not to leave any shells in. If you do get some shell in, the easiest way to take it out is using the half shell of the egg as a scoop. Fingers just dont' work. Add a pinch of salt and pepper, and with a fork beat for a minute or two, at a moderate pace (about 60 strokes is perfect). Do not use a blender or mixer for this step, you don't want to over beat them. 
If you will use a salty cheese, be careful to add less salt, so that the omelette does not turn out too salty. Sometimes I also add different herbs and spices, like paprika, dill, oregano. You can try different combinations, and find your favorite. 


You need to have everything on hand and act pretty quick. 
Heat a 8 inch frying pan on medium-low, for 5-6 minutes; add the room temperature butter (cold works too), and when it is foaming add the eggs. Turn the heat on medium-high. Throw in the frozen butter, and using the fork,  mix the eggs, like when you do scrabbled eggs, bringing the margins towards the middle, letting the uncooked egg get into the empty side of the pan. Do this for 30-40 seconds, until the eggs are almost cooked, but still a little runny. Spread the egg curd into an even layer, but without pressing on it hard. 
The frozen butter and not over beating and overcooking the eggs is the secret and trick for a fluffy, creamy and soft omelette. The proteins of the eggs resemble lets say to cooked spaghetti. The frozen butter melts slower, having time to coat all the protein fibers in the eggs before they coagulate, helping them not to stick to each other and become a hard ball of protein fibers, so they are loose and that's why you get a much fluffier omelette. Just like you add oil to spaghetti so it doesn't stick.
Sprinkle the cheeses all over the top, and using a spatula carefully fold the omelette in half, ending up with a sandwich of egg and cheese. Turn the heat off, and let it stand for another minute, so the cheese can melt. 


The best would be to serve it on a heated plate. 
I like having this simple cheese omelette with fresh bread and some tomato salad. Just cut the tomatoes in smaller pieces, season with little salt and extra virgin olive oil.
Love how the melted cheese starts running when you cut in. Yumm


Enjoy this hearty, nutritious and high in protein meal as a perfect breakfast or any time of the day, as lunch or quick snack.

Thursday

Citrus tart

I didn't make sweets with citrus before, but this tart was inspired by a friend who is pregnant, and told me she loves eating citrus this period and I wanted to bake something for her. This citrus tart sounded like the perfect choice.


Ingredients:

Crust: 
1 1/2 cups flour
4 teaspoons sugar
pinch of salt
1 stick butter, cold and cut in half inch cubes
1 egg, separated; you will need the egg yolk and the egg white as well
1 tablespoon milk

Filling:
4 eggs
1 cup sugar
1 cup citrus juice (I used 1 orange, 2 lemons, 1 tangerine and used a citrus juicer, so it is fresh and fragrant; also I left some pulp in for extra taste and texture)
1/4 cup heavy cream

These ingredients are for one pie. I made two pies today, doubling the quantities.

You will also need a 9 inch pie pan, a rolling pin, plastic wrap, pie weights or dry rice/beans, parchment paper, and some raspberries, fresh mint for garnish.

 Method:

For making the crust:
In a food processor or stand mixer pulse/mix together flour, sugar and salt. Add the cold butter and pulse/mix until you have pea sized butter lumps. In a small bowl lightly beat egg yolk with the milk, then add it to the dough. Mix until it forms a ball. This shouldn't take very long, 1-2 minutes. Don't overwork the dough. 

Make  a ball out of the dough, place it between 2 plastic wrap sheets, and roll it with a rolling pin into a circle, 1 inch bigger than the pan. Remove the plastic wrap on the top, then with the help of the other plastic wrap lift the dough sheet , invert it in the pan, and discard the second plastic wrap. Fit dough into pan, making sure it rises above the pan's edge a little. Freeze for 10-15 minutes until it hardens. 
Preheat the oven to 350 degrees.

Remove pan from freezer, and prick the dough several times with a fork. Line with parchment paper, then fill with pie weights or rice/beans, and bake on the middle rack for 20 minutes. When 20 minutes pass, take it out of the oven, gently remove parchment paper and weights, and bake it for more 10 minutes.

Meanwhile prepare the filling by mixing all the ingredients together.
Take out the pan from the oven, and brush it with the egg white you saved.
Place the pan on a baking sheet, pour in the filling, and bake for 25 minutes.
Remove from oven and let it cool completely on a rack, for at least 1 hour.
Gently remove from the pan, and place it on a serving platter. 
Garnish with fresh mint leaves and raspberries, or with orange/lemon zest.
Serve it cold, with whipped cream or just as it is.  Tangy sweet delicious tart.

Wednesday

Cobbler

What is cobbler? 


This is what Wiki says : Cobbler refers to a variety of dishes, particularly in the United StatesIreland and United Kingdom, consisting of a fruit or savoury filling poured into a large baking dish and covered with a batterbiscuit, or pie crust before being baked. Unlike a pie, cobbler never contains a bottom crust.
Cobblers originated in the early British American colonies. English settlers were unable to make traditional suet puddings due to lack of suitable ingredients and cooking equipment, so instead covered a stewed filling with a layer of uncooked plain biscuits or dumplings, fitted together. When fully cooked, the surface has the appearance of a cobbled street. The name may also derive from the fact that the ingredients are "cobbled" together.
In the United States, varieties of cobbler include the Betty, the Grunt, the Slump, the Buckle, and the Sonker. The Crisp or Crumble differ from the cobbler in that their top layers are generally made with oatmeal. Grunts, Pandowdy, and Slumps are a New England variety of cobbler, typically cooked on the stove-top or cooked in an iron skillet or pan with the dough on top in the shape of dumplings—they reportedly take their name from the grunting sound they make while cooking. A Buckle is made with yellow batter (like cake batter), with the filling mixed in with the batter. Apple pan dowdy is an apple cobbler whose crust has been broken and perhaps stirred back into the filling. The Sonker is unique to North Carolina: it is a deep-dish version of the American cobbler. In the Deep South, cobblers most commonly come in single fruit varieties and are named as such, such as blackberry, blueberry, and peach cobbler. The Deep South tradition also gives the option of topping the fruit cobbler with a scoop or two of vanilla ice cream.

I had a lot of strawberries in the fridge, bought on a sale at Whole Foods, and wanted to make something sweet and simple. I have been organizing and cleaning our home the whole day, and didn't want to get into any complicated recipes, as it was already past 10 PM. I never made a cobbler before, but thinking of deserts made with fresh fruit, this came to mind. I thought it must be easy to make, and looked up some recipes on the Internet. There are many different ones, all with various ingredients, and could not decide on one. So I just made whatever felt right, by ear. 
This is how I made 4 ramekins of cobbler: 
Preheat oven to 350 degrees F ( 180 C ).
Wash and cut the strawberries in quarters and put them in a sauce pan. Added some frozen blueberries I remembered I had in the freezer. I always keep frozen berries for milkshakes. You can make any combination of fruit you like. You can also add apple, peach, banana, orange, apricot... any combination that seems yummy to you, try. I had about 3 cups of fruit. 
In a small bowl mix 1/4 cups of sugar with 1 tablespoon corn starch and add on top of the fruit, with 1 tablespoon pure vanilla extract. The corn starch is easy to find at any grocery store, and its role is to make the juice of the fruit a little thicker. 
Mix everything a little, and place the pan on medium heat, until it starts to bubble and all the sugar has melted.

While the berries are on the stove, start making the dough. 
I used my stand mixer fitted with the paddle attachment for this step. But just because I was lazy; you can do it faster by hand using a dough cutter or even a fork. In the bowl of the mixer put 1 1/2 cup of flour, 1/4 cup of sugar (brown sugar would be better I think, but I only had normal sugar on hand) 1 tablespoon baking powder, a pinch of salt and mix on low speed. While it mixes on low add 1/4 cup of heavy cream. You can substitute this with sour cream or yogurt, creme fraiche, or even skip this step. I like to add something like this in the doughs I make, because it gives them extra richness and fluffiness. Add 6 tablespoons ( 80 grams ) of very cold butter, previously cut in small cubes. Mix everything on low for just 1 minute or so, until you get a crumbly dough like this:
The best part of making this dish, is that you don't need to precisely measure the ingredients, it does not really matter. If the dough looks too dry add a little cream or butter. If it is to liquid add flour. No problem. Just don't overwork the dough, because the butter will melt, and you don't want that.
To put everything together, get 4 ramekins, or a bigger and deep dish, a pie dish, a Pyrex dish, or whatever you have on hand, that can go in the oven. Pour the fruit mixture on the bottom, and add some dough on top. 
You also can have different ratios of fruit to dough as well, depending on your preference. I like it to have it 1:1 just because I am obsessed with symmetry. So that each spoonful of cobbler gets the perfect amount of fruit and dough. :) 
But if you like fruits more, you can put just a little dough on a lot of fruits. In this case, would be very pretty to make the dough in a ball, roll it with the rolling pin in a thick sheet, and using cookie cutters cut shapes of dough, like stars, hearts, squares, whatever you fancy, in different sizes, and place them on top of the fruit mixture. I wanted to do so but my laziness didn't let me. I just put a dollop of dough using an ice cream scoop, in each ramekin filled with fruit.  Like this:
Bake this babies for 30-40 minutes. They are done when the dough puffed up and is golden, and the fruit is bubbling. 

Let them rest for 15 minutes before serving, for the fruit juices on the bottom to thicken, and also because it is too hot to eat right away. The best would be to add a scoop of vanilla ice cream on top of the warm cobbler ... mmm 
Unfortunately we only had green tea or coffee ice cream, so we ate them without ice cream. Hope to never make this mistake and run out of vanilla ice cream ever again! :P